如果想open code directiory from command line, 可以用code command
code Unit-Test-Demo/
如果code command 报错, go to VSCode, Ctrl+Shift+P, 输入shell, 点shell Command: Install code command in PATH
Theme
File ICON THEME
- 到VSCode Extension 下载Ayu 然后Reload
- 然后Ctrl + Shift + P, Preference:File Icon Theme –> Ayu
![]()
C++ Windows
下载MINGW
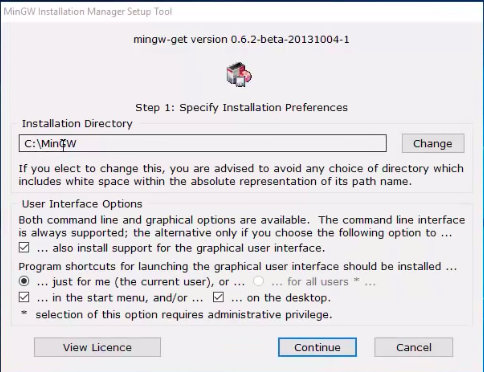
- 下载MinGW Installation Manager
- click install
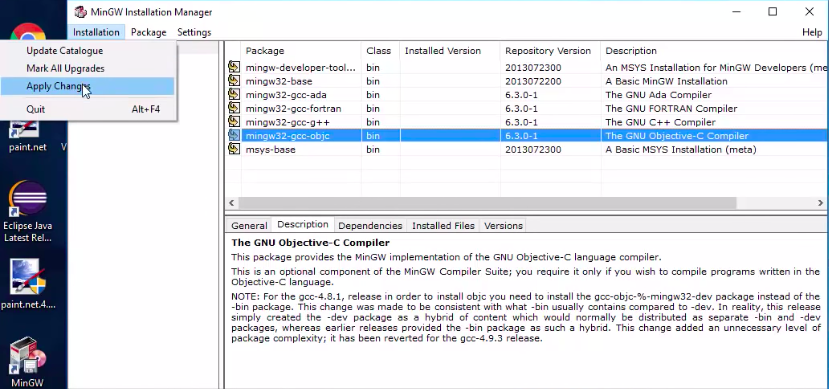
- 右键所有的Package -> mark for installation, 再点Installation -> ApplyChanges
add MINGW to system path
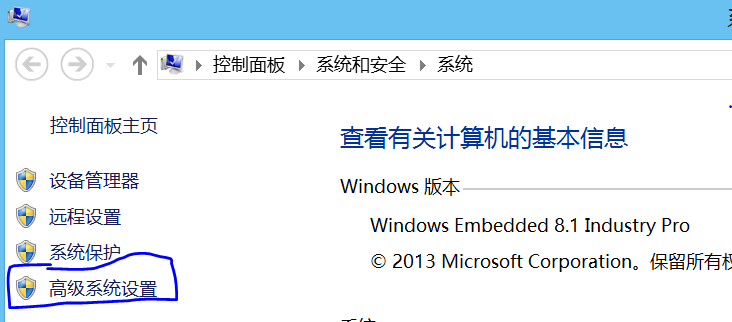
- 控制面板–> 系统和安全 –> 系统 –> 高级系统设置
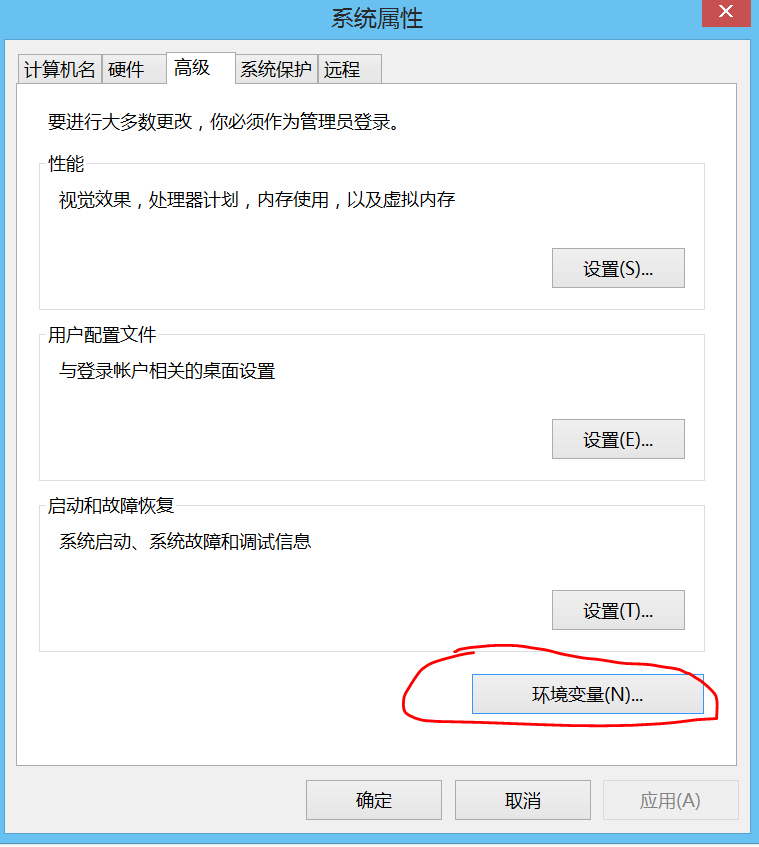
- 高级 –> 环境变量
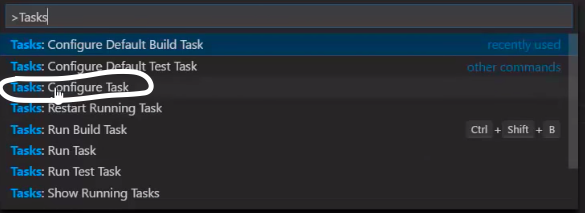
- 系统变量内找到Path, 双击编辑, 把;C:\MinGW\bin 加在变量值的后面
Build C++
- 建一个folder, folder 里面有main.cpp, 需要build的程序
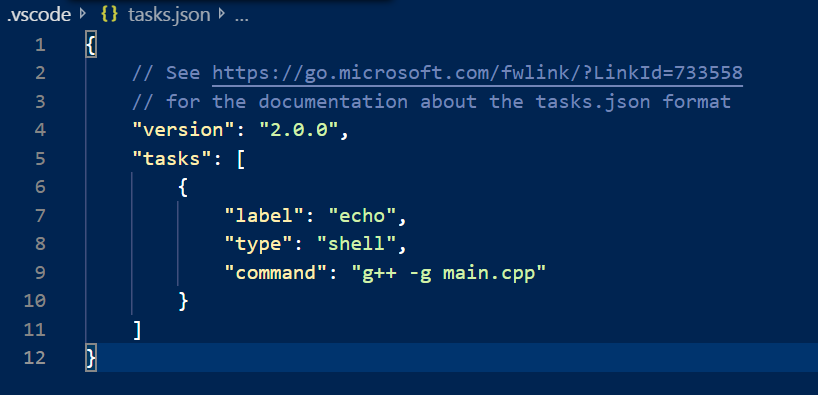
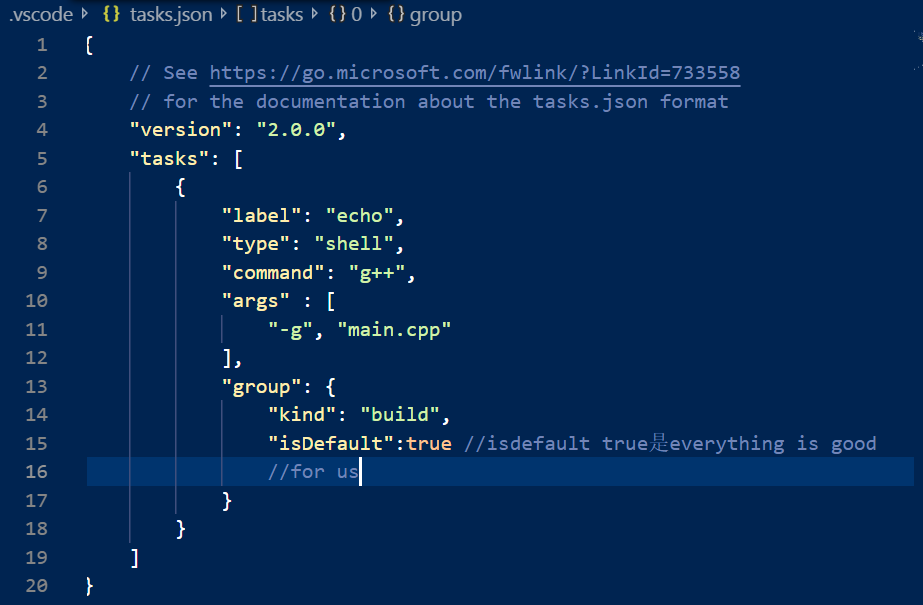
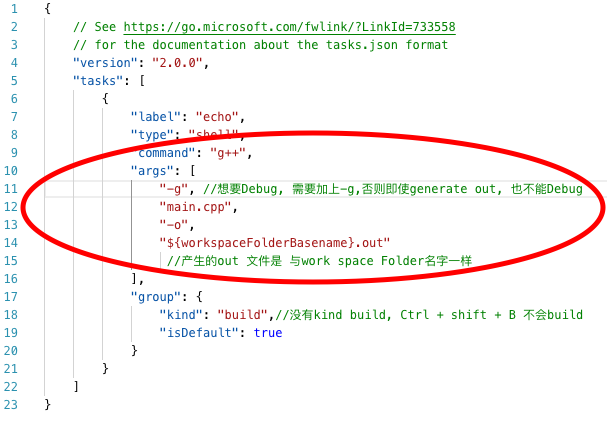
- Ctrl + shift + p , search tasks, 选择 Tasks: Configure Task –> 选择create task.json file from template –> 选择 Others (Example to run an arbitrary external command), 会生成一个tasks.json文件, 我们把 “command” 改成 “g++ -g main.cpp” (-g is debug) or 写成如下图格式
- Ctrl + Shift + B 可以build project (如果出现permission defined 错误,关掉VS Code, 重新打开再Ctrl+Shift +B, build)
- 可以在VS Code中新建terminal, 点plus button. run a.exe

注:不用Ctrl + shift + p, search C\Cpp: Edit Configurations, 在新的VS Code的configuration中自动设置好了MinGW include path
查看是不是把 MinGW 放进Environment variable,打开prompt, 输入
g++ --version #如果MinGW 放进Environment variable,会显示信息
Debug in VS Code
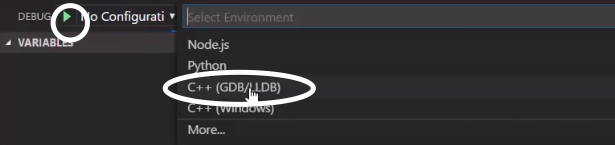
- 点击左侧 Debug Panel, 点击绿色箭头 –> 因为我们用MinGW, 选择C++ (GDB//LLDB), 生成一个Default lauch.json
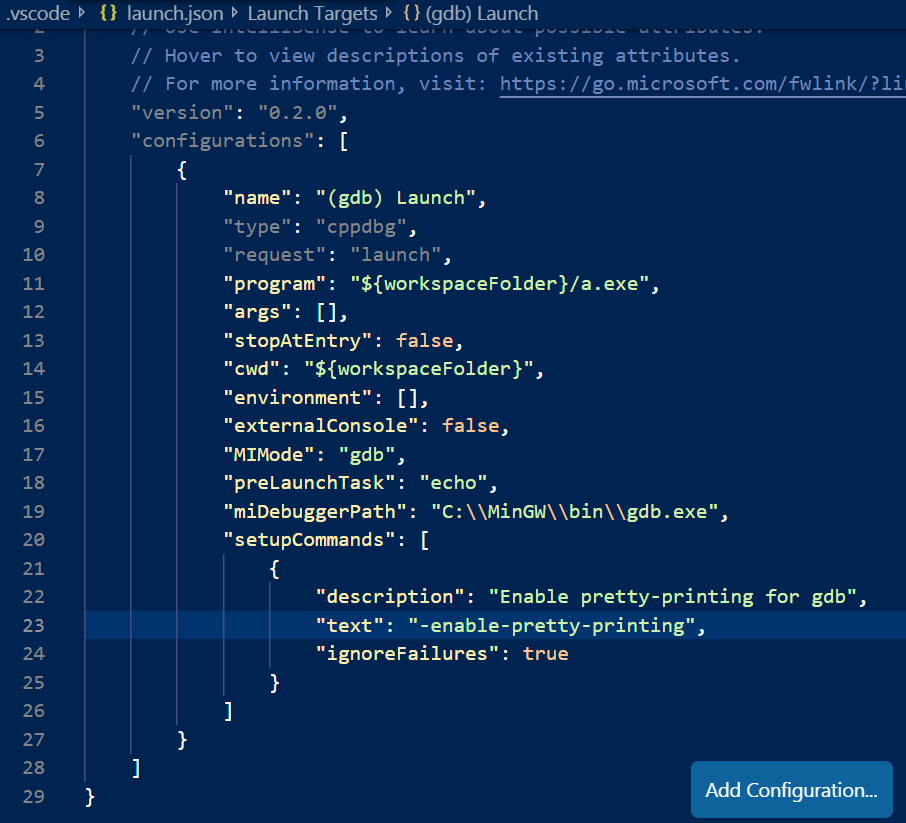
- 修改launch.json
- 修改 “miDebuggerPath”: “C:\MinGW\bin\gdb.exe” (gdb.exe 是debugger)
- add “preLaunchTask”: “echo”, 这个preLaunchTask 需要与tasks.json task 命名一样, (是为了build code first, then start debugging)
- 修改”program”: “${workspaceFolder}/a.exe”, 这是告诉什么exe 用来debug的
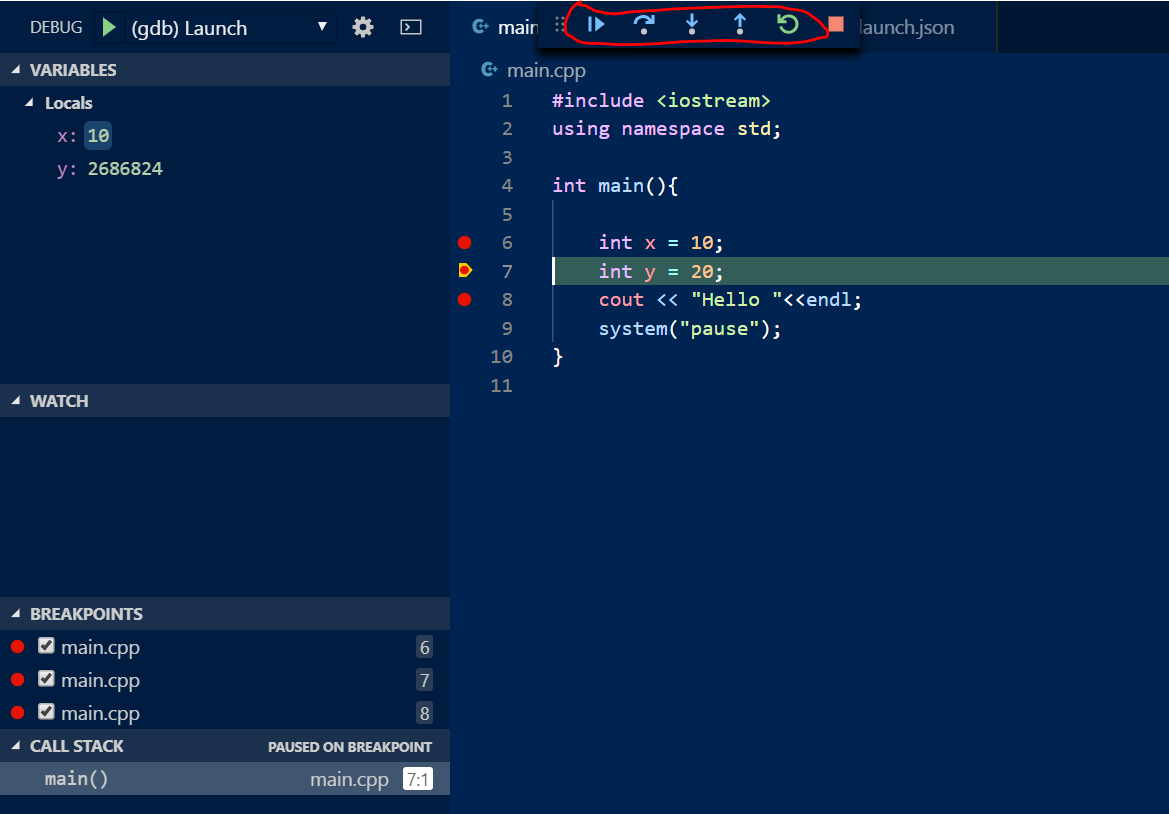
- 可以再点击绿箭头, 开始Debug, 可以设置Break point,来方便debug
- 当开始Debug,可以控制到下一个step over break point,step into, step out
注: stopAtEntry, 表示当debug开始, 程序一开始先停住
C++ Mac
下载code runner
- 到extension 中找到code runner,下载
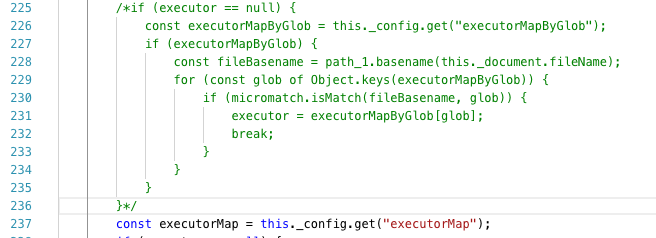
- 到user/用户名/ .vscode / extensions / formulahendry.code-runner-0.9.10 / out /,codeManager.js, comment 掉line 12 和 line 225~236, 如图
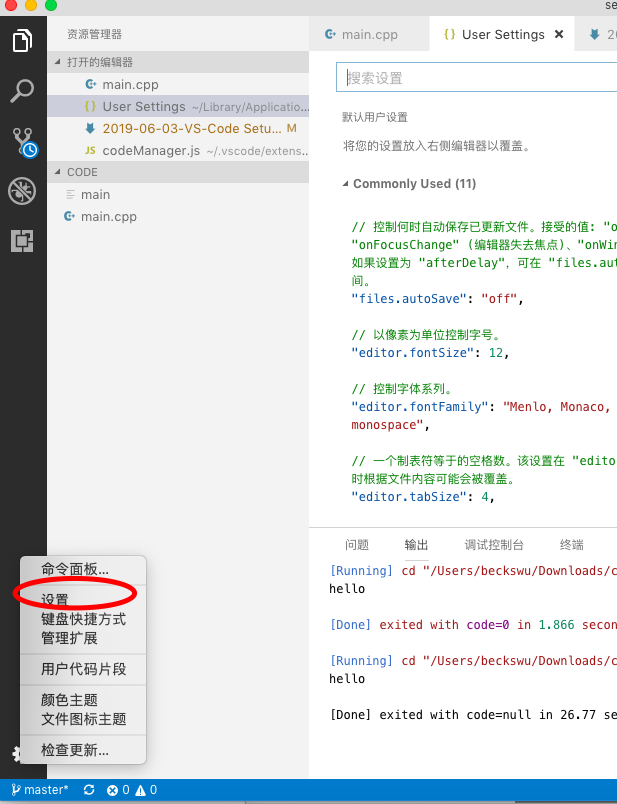
- 重新加载,或关掉VS Code 再打开,点击右上角箭头,run, 但这时候如果code 有cin, 不能在输出panel上 输入到程序

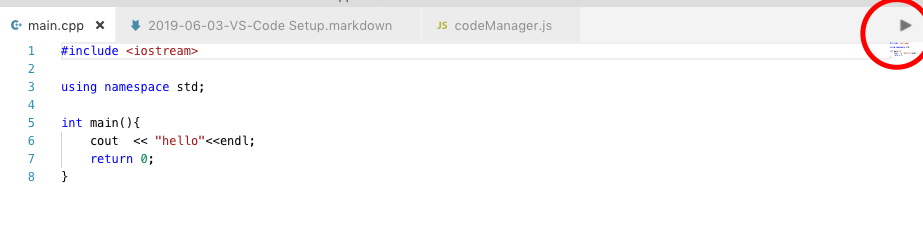
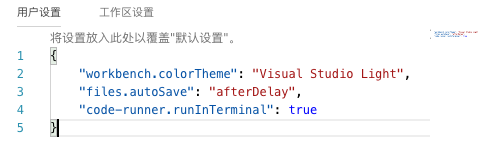
- 点右下角 –> 设置, 在用户设置中 (user settings) 加上 “code-runner.runInTerminal”: true
- 再点run code时候,就会在terminal 中run code,
设置C++ 版本
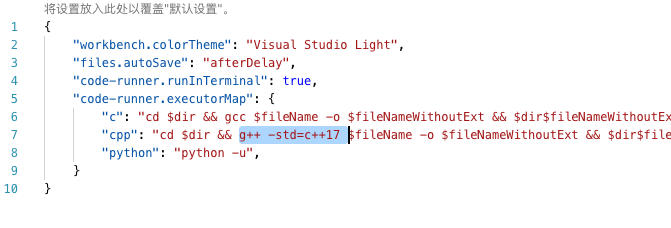
- 点右下角 –> 设置, 在用户设置中 (user settings) 输入 ”code-runner.executorMap”:, 然后点tooltip,会蹦出default的格式,
- 只保留cpp, 其他的可以删掉,在g++ 后面加上 -std=c++17, 再点run code 会显示c++版本

Debug
- Ctrl + Shift + P, Tasks,–> Tasks: Configure Task –> create task.json file from template –> Others
- change command and add args (如下图), 设置后之后, Ctrl + Shift + B 就可以build code了
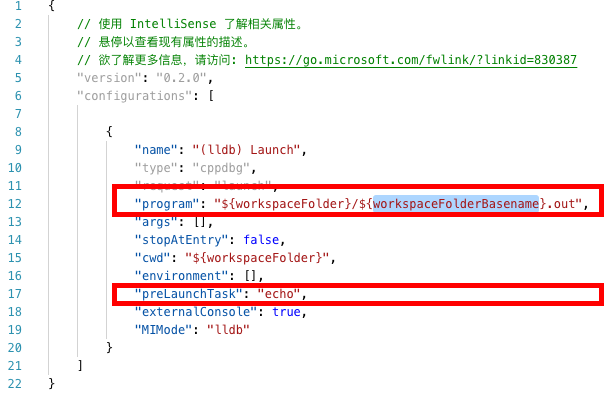
- 修改launch.json 如下图, ( preLaunchTask 和 program) , 之后就可以设置break point Debug了
设置多个Tasks
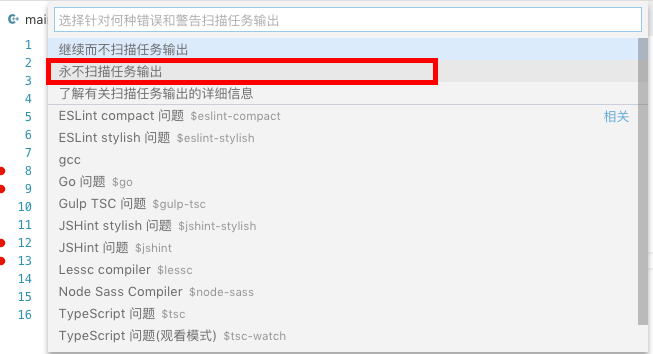
- 可以在Task.json 中设置多个Tasks, 这样build 完成后可以run build的结果,Task 如下图配置
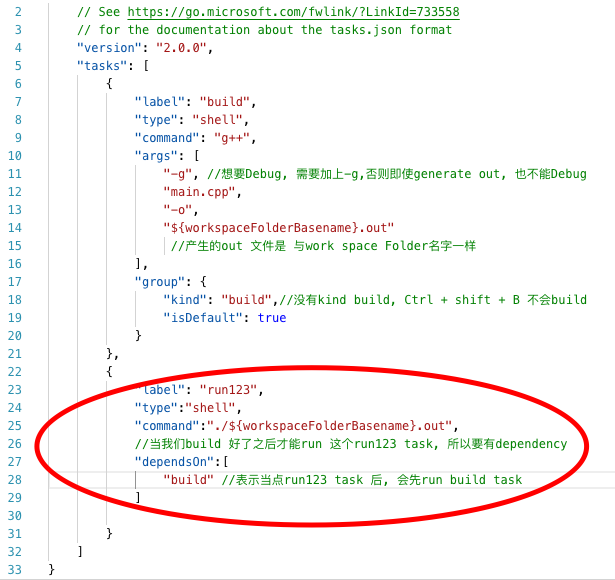
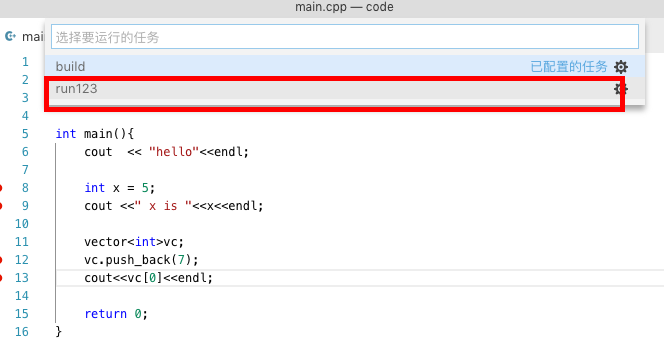
- Terminal (窗口) –> run task (运行任务) –> Never scan the task output, 终端中会先build 生成.out 然后run 这个.out
Virtual Environment
install certain packages for certain projects, 比如你以前的project 用了django version 1, 现在你想要用django version 2 对于新的project, 可能会break 以前的project。我们不想same project points to the same version of django, each project should have the same packages each other
- don’t put any file inside your virtual environment, 因为environment 可以随时throw away and rebuild
- You shouldn’t commit your virtual Environment into source control, 一般git ignore file的template for python project 一般都ignore virtual environment
- You should commit requirement.txt 让其他人build environment you used to run project
在Terminal 中
- 创建virtual environment,
- 创建virtual environment folder名为project_env: python3 -m venv project_env, 不会把系统的packages引用到virtual environment,所有的packages 都需要装
- 引用system packages到virtual environment: python3 -m venv project_env –system-site-packages
- activate virtual environment, source project_env/bin/activate
- 安装library
- 安装local的library, 不会安装到system library上: pip install library名字
- 安装别人export的library, pip install -r requirement.txt
- 显示当前virtual environment 的packages
- 显示所的library pip list
- 显示只在local安装的, pip list –local
- 输出requirement.txt 用于其他然安装, 有library 名字和版本
- 只输出在virtual environment中本地安装的: pip freeze –local > requirement.txt
- 输出virtual environment所有library: pip freeze> requirement.txt
- dctivate virtual environment: deactivate
pip list #查看所有装的library 和 version

cd desktop
python3 -m venv project_env #创建virtual environment 名为project_env
#-m module (这里是venv), python会search sys.path and execute that module as main module

#To activate virtual environment
source project_env/bin/activate

which python
#会显示Desktop上的python, python environment 就是project_env中virtual environment

pip list #显示pip, setuptools
#如果现在装什么library通过pip, 只会装在project_env的environment

pip install tqdm #装tqdm进virtual environment

pip list #显示pip, setuptools, tqdm

pip install requests

pip list #显示certifi, chardetidna (2.8), pip (9.0.1), requests (2.22.0), setuptools (28.8.0),tqdm (4.32.2), urllib3 (1.25.3)
#除了requests 和tqdm,其他的library 是dependency of request


#export packages, 可以让其他人去install your packages and dependency you are using, the version也会install一样的
pip freeze #similar to pip list, it gives packages and the correct format for requirement of txt file

pip freeze > requirement.txt #输出


#deactivate virtual environment
deactivate

#delete environemnt
rm -rf project_env/ #删除project_env/ 这个folder


mkdir my_project
python3 -m venv my_project/venv  #my_project/venv 是my_project下面文件夹名字
source my_project/venv/bin/activate #activate environment

#装我们之前virtual environemnt export的library
pip install -r requirement.txt

pip list #显示所有装好的library,应该与之前export 的library是一样的

cd my_project/


#把现在所有的装好的library 都放进新virtual environment
python3 -m venv venv_folder --system-site-packages
source venv_folder/bin/activate
pip list #显示python global装好的library

#接下来以后在virtual environment装的library不会影响system的packages
pip install Flask
pip list --local #只显示在local 装的library Flask,local 不会影响system packages

pip freeze --local > requirement.txt #只会把在local library output到requirement.txt

deactivate
pip list #不会显示local装的flask
Python Mac
到VS Code extenison 安装Python 和 Python for VSCode; Shift + Option + F 安装format code autopep8, 装好后Shift + Option + F 会auto mate code; 再装pyLint: 在run之前,会显示出code的error or warning
- 方法一: 下载code runner (详见C++ Mac 下载code runner), 点run code,
- 方法二: 在script上右键 Run Python File in Terminal
Switch Python Version
在VS code 左下角显示当天Python 版本,点击它如图

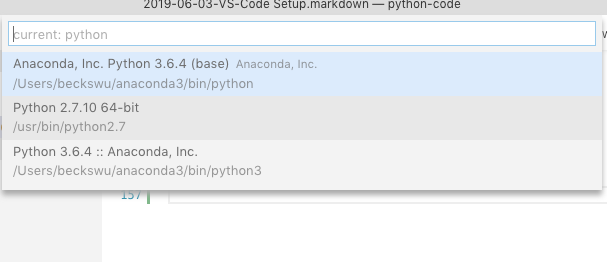
如果选了2.7, 再run python, 会显示2.7

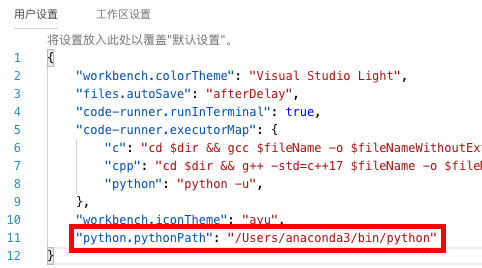
Setup Default Python Path
可以设置所有python 版本 默认的路径: 设置 –> usersetting –> 加上python.pythonpath
Setup Python Virtual Environment
通过terminal 建立一个folder
python3 -m venv venv

source venv/bin/activate #activate virtual environment
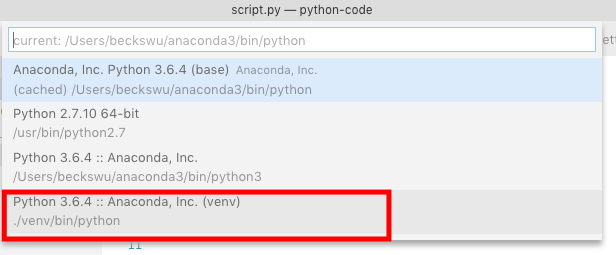
VS code automatically pick up virtual environment. 点击python 的版本, 会看见新建的python virtual environment
之后打开VScode 文件夹中的setting, python-path是venv文件夹中的virtual environment的python.
Change Code Runner Python Version: change to the python interpret that python is currently using
设置 –> usersetting –> 设置”code-runner.executorMap”, 如果想自己customized setting, 可以去Extension的code runner安装下面有说明
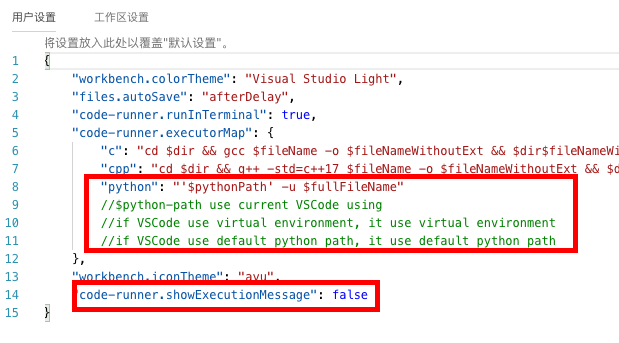
之后点code runner, code runner 的版本应该与我们选择python 版本一致
Git
- Ctrl + Shift + P : Git Init, 选择初始化的folder, 在VSCode working directory不会显示.git, 因为VSCode filter it out
- 在working directory to create git ignore file to ignore virtual environment
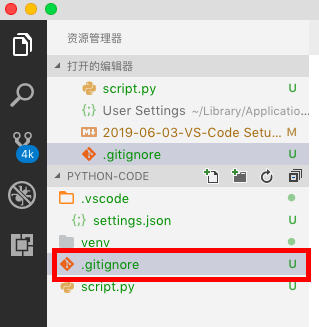
.gitignore 文件中的content
venv
.vscode
- 点➕, stage change, or 点击右上角的…button, stage all change
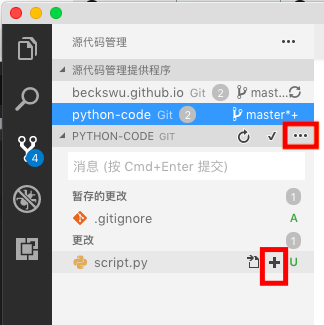
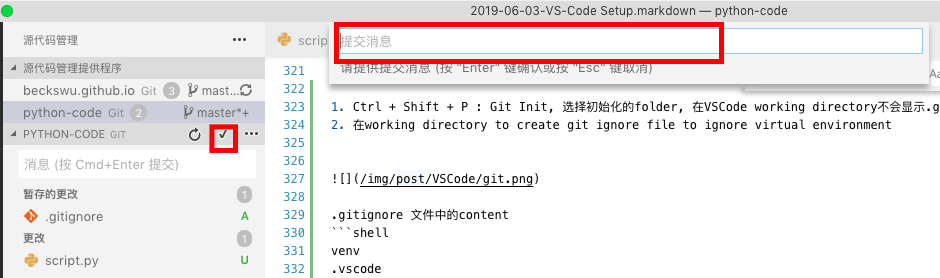
- 点✅ , 然后输入文字, to commit changes
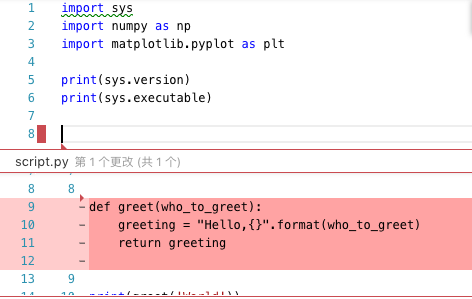
- commit之后更改源代码, 会在line number有个红点,点它,会显示上次commit的原版本
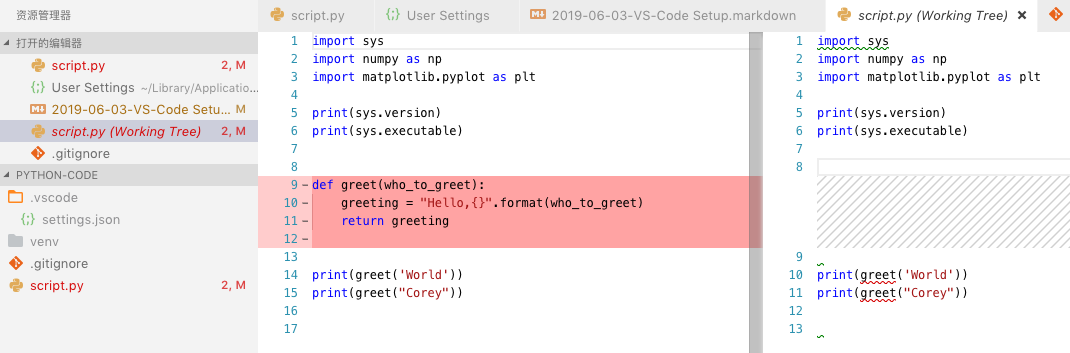
- 更改完源代码,go to git panel, click unstaged file, 会显示更改的side by side
- 点击右上角的…button, click push to, 可以push git 到remote repository
Debug
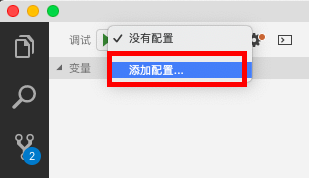
- Go to Debug panel –> click Add Configuration –> Python File, 会create a launch.json 在work space directory
- 然后就可以click Debug button, start at the break point
- can add variable in the watch section, to monitor its current value, 比如我们想观测a的值, 就可以输入a, a变化,watch section 的a也会发生变化
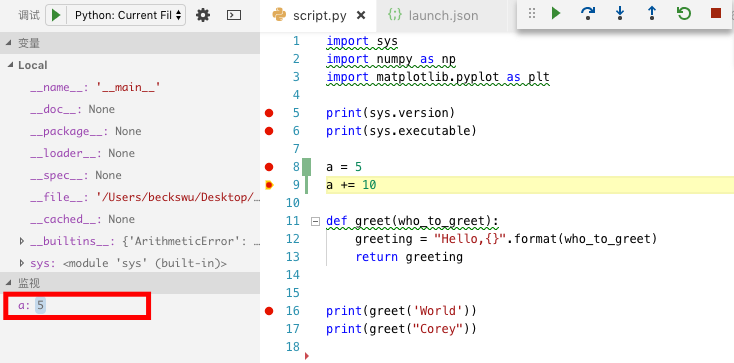
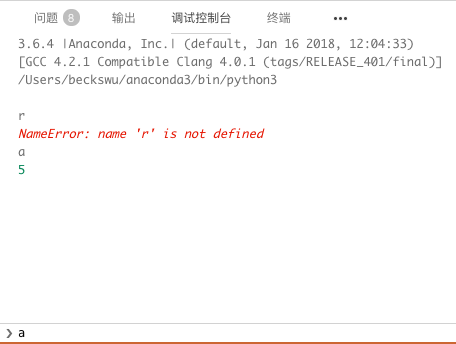
- 我们也可以在Debug Console (调试控制台中) 输入variable,debug console 就会输出它的值
Unit Testing
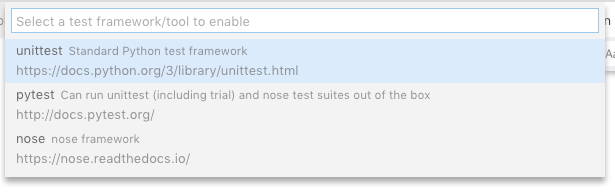
- Ctrl + Shift + P, Discover –> Python: Discover Tests –> 之后会让你选择framework of unit test, 我们选择unittest –> root –> 选择pattern of unit test (test 文件是怎么命名的), 选择了test_*.py (表示所有的test 都是 test_cal.py, test_class.py, 不能是testcal.py)

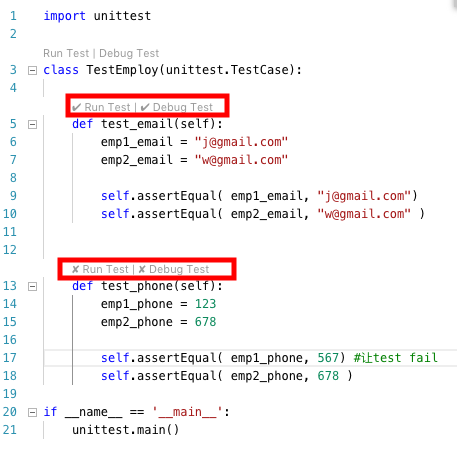
- 再打开任意的test_*.py, 可以看见每一个test case上有run_test (只run这一个test case, 点后如果pass,会打对勾) 和 debug_test 两个选项可以点, class上也有run_test 和 debug_test, class上的run_test 是run all test case,
- 如果test pass, 会打对勾,如果test fail 会打叉
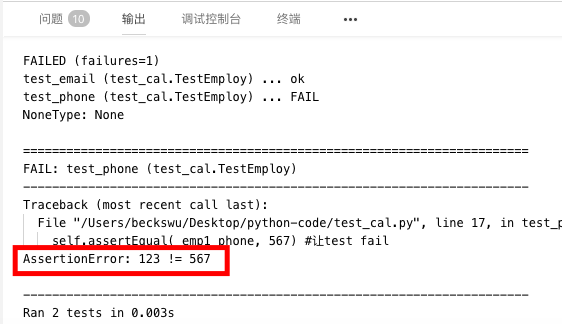
- 点击VSCode 下面的warning, 可以选择View Unit Test Output or Run Failed Tests

- 点了View Unit Test Output, it shows where test case failed
Customized
Keyboard Binding
左下角setting -> Keyboard Shortcuts

[{
    "key": "cmd+R",
    "command": "editor.action.insertSnippet",
    "args": { "snippet": "<span style=\"color:red\">$TM_SELECTED_TEXT</span>$0" },
    "when": "resourceLangId == markdown"
},{
    "key": "cmd+G",
    "command": "editor.action.insertSnippet",
    "args": { "snippet": "<span style=\"background-color:#FFFF00\">$TM_SELECTED_TEXT</span>$0" },
    "when": "resourceLangId == markdown"
}
]