What is Docker
Docker is the software container platform. It can be used to replicate dependencies of prdocution machines
Containers allow a developer to package up an application with all of the parts it needs such as libraries and other dependencies, and ship it all out as one package
WorkFlow
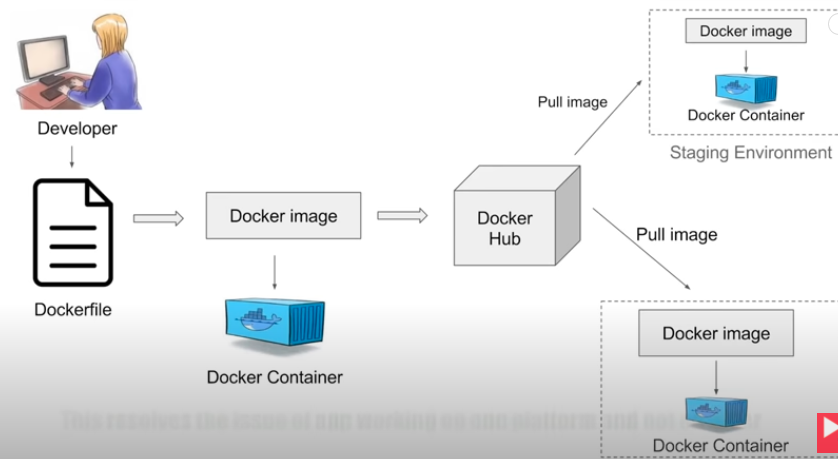
- developer will define all applications, dependency and requirement in
Dockerfile(used to create docker image)- When running docker image, you get docker container. Docker containers are the runtime instances of a docker image.
- Images can also be stored in an online cloud repository (version control system) called Docker Hub. It resolves the issue of app working on one platform and not on other
- Images can be pulled to create containers in any environment
- https://hub.docker.com: can find lots of public docker image
Virtualization vs Containerization
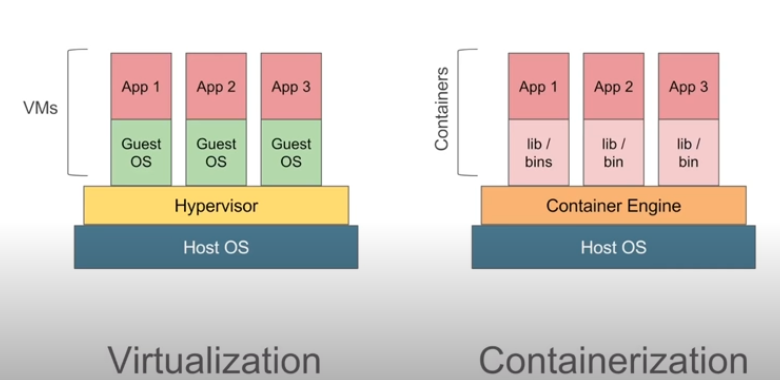
Virtualization:
- have software Hypervisor which is used to create and run virtual machine.
- On Hypervisor can create multiple virtual machine on host operating system. These virtual machine has their own operating system and it does not use host operating system. So there can be an overhead on the host platform.
- In virtual machine, has to allocate a fixed memory and space on every machine. So there are a lot of waste of memory and space
Containerization:
- We have container engine and don’t have a separate operating system.
- We have container where we have the application and its dependency
- It use the host operating system
- The space, memory and other resources are not fixed. It will be taken as per the needs of the application so there is no overhead. It is lightweight and fast
It can be container running on virtual machine. E.g. windows applciation on windows system (virtual machine) on linux (host machine)
Client-Server Architecture
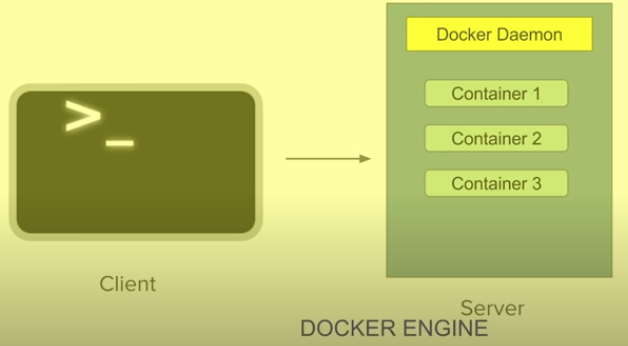
- In docker, command interface is the client
- Docker server has all the containers. Docker server receive the commands or API Reqeust from docker client
- Docker client and server (daemon) can be present on the same host or different hosts
- All the components of docker client and server form the docker engine
Advantage
- Build application only Once: An application inside a container can run on any system that has Docker installed. No need to build and configure application mutiple times on different platforms
- Meaning: your test environment is identical to the one on which the application will run in production
- Portability: Docker can run on any platform. e.g. Amazon ec2, Google Cloud platform, Rackspace server, VirtualBox etc.
- Version Control: Like Git, Docker has built-in version control system.
- Isolation: Every application works in its own container and does not interferes with other application running on the same system.
- Multiple container can run on same system without interference.
- For removal, you can simply delete the container and it will not leave behind any files or traces on the system
- Productivity: Docker allows faster and more efficient deloyments without worrying about running your app on different platforms.
- Developer only focus on creating code and software, and package the software along with all its dependencies into a container and will not worry about how this will be deployed on what all platforms it has to be deployed . Docker makes this process very easy, efficient, and cheap
Install docker
docker images ## List all images
docker ps ## List all running container
docker ps -a ## List all  container
docker run xxx ## Runing xxx image

sudo service docker stop ## Stop docker
sudo yum remove docker ## uninstall docker
Install Docker on AWS EC2 / Docker Basic
Command
docker version ## Give information about docker engine( docker client and server)
docker stats ## give the details of running containers, memory usage, input/output
docker system df ## check the disk usage of docker. It gives all the sizes of containers
docker system prune ## careful with this command. remove all stopped container, all network not used by listed container, and all dangling images, any dangling in the build cache. Dangling images means image which are not associated with running container
## IF images is running, will not be removed


docker -v ## version of docker, same as docker --version
docker info ## give more information about docker installed on your system

docker help ## Give information of other commands
docker login ## Login your docker hub account


# Then will inside the ubuntu system

## Start and Stop Container
docker start container_id #start the container
docker stop container_id #stop the container
Docker Image
- Docker Images are templates usd to create Docker Container. Docker Images are stored in Registried (e.g. Docker hub) which can be locally or remote
- Docker can build images automatically by reading the instructions from Dockerfile
- A single images can be used to create muliple containers
## Give all details about docker image
docker images --help

## Pull images from docker hub
docker pull [image_name]

## E.g. Download ubuntu images from docker hub
docker pull ubuntu

## specify tags
docker pull ubuntu:18.04


## Show all the images
docker images
docker images -a ## Also show default hidden images
## Same as docker image ls -a

## only show image id
docker images -q

## show another column called digest that can be used for identify images
docker images --digests

## Filter, a dangling image is one that is not tagged and is not referenced by any container
docker images -f "dangling=false"


## *************** RUNNING **************
docker run ubuntu
## find ubuntu is not running
docker ps  ## List all running container

## Instead use
docker run --name becksUbuntu -it ubuntu bash
## --name give container a name
## i is interactive, t means allocatea pseudo-TTy, it means start ubuntu and login into
docker run --name becksUbuntu -it ubuntu bash then open a new terminal windows, run docker ps can see it is running

## Inspect Image
docker inspect Ubuntu
## First stop container otherwise cannot remove
docker stop becksUbuntu

## Remove image
docker rmi ubuntu # remove the image
## Force remove and specify tag
docker rmi -f ubuntu:18.04

## It won't show ubuntu images if run
docker images -a


## Get history of the images
docker history ubuntu
Docker Container
Containers are running instances of Docker images
A container image is a lightweight, stand-alone, executable package of a piece of software that includes everything needed to run it: code, runtime, system tools, system libraries, settings
Feature of Containers:
- Lightweight
- Less resources are used
- Booting of containers is very fast
- can start, stop, kill. Remove containers easily and quickly
- Operating system resources can be shared within Docker. Single running process with no
initsystem- Container run on the same machine sharing the same operatings system Kernel. This makes it faster
- Contains all application dependencies
In the Docker Architecture
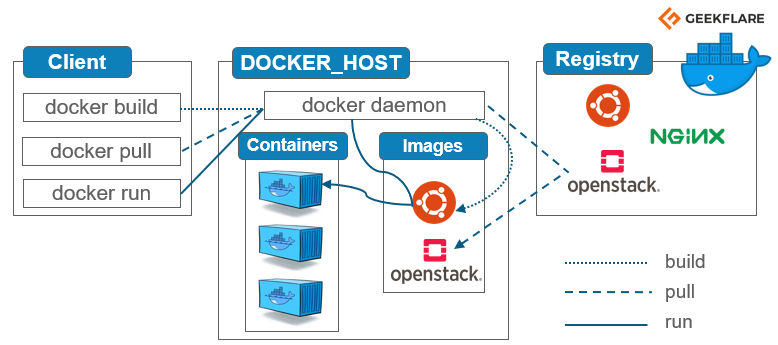
- Docker Client is the command line whenever you use docker (e.g.
docker run,docker pull) - Docker Host: available on your local system. It has docker daemon, images and containers sections
- Registery: where we have the images.
When call docker pull, it goes to the registry (e.g. docker hub), get the images and save the images in your system on Docker Host (only keep images on Images section in Docker host and won’t create a container)
When call docker run, it checks for the images on your local system on Docker Host. If it is available, will run that image and create a container. In case, if not available, it will go to the registry, pull the image and create a conatiner (docker run 包括了 docker pull)
docker build is used to create a docker images using Dockerfile then create a container
docker run: Run a command in a new containerdocker start: Start one or more stopped containers
## Running container
docker run --name becksUbuntu -it ubuntu

docker start becksUbuntu
docker stop becksUbuntu
docker pause becksUbuntu # becksUbuntu bash will not take command (输入任何不会显示在becksUbuntu的bash上)
docker unpause becksUbuntu

## See the top process of the container
docker top becksUbuntu
## Can see memory, input, output and all these memory usage
docker stats becksUbuntu

##  Attach your terminal to the running container
docker attach becksUbuntu

## Kill conatiner
docker kill becksUbuntu

## Remove container: can remove by container ID or name
docker rm becksUbuntu
Run Jenkins on Docker Container
to pull Jenkins
docker pull jenkins/jenkins


## -p: expose port 8080 (local) of the container to port 8080 (server) of the host machine.
## -p: for api expose port 50000 of the container to port 50000 of the host machine.
## -v: specify Jenkins home, So once stop Jenkins container, data won't lose. Also create volume
docker run --name myJenkins --platform linux/amd64  -p 8080:8080 -p 50000:50000 -v /Users/becks/Documents/Jenkins_Home:/var/jenkins_home  jenkins/jenkins


## DON'T USE BELOW COMMAND
## This will start jenkins container. However this command, all the data, plugins, information stored will be coupled with the container.
## Once your stop container or delete container, it will lose
docker run -p 8080:8080 -p 50000:50000 jenkins/jenkins
Create Admin and a sample job
- Then go to the http://localhost:8080/. For admin password, go to Jenkins_Home your created, -> secrets folder initialAdminPassword
- Installl suggested Plugins
- Create First Admin User. Click Save
- On the top right, click username and change password
- Go to the main page -> click New Items on the top left
- Create a freestyle job, job1. In the build section, click shell, add command
lsthen apply and save
To start / stop Jenkins
docker start myJenkins
docker stop myJenkins
Next step is to remove Jenkins containers by docker stop myJenkins and docker rm myJenkins
Then create a new container but different names and different port for Jenkins. Then docker run --name myJenkins2 --platform linux/amd64 -p 9090:8080 -p 50000:50000 -v /Users/becks/Documents/Jenkins_Home:/var/jenkins_home jenkins/jenkins. Go to http://localhost:9090/. Can use the same login credential at the first and see the job created earlier
Use Docker volume, It is easy to share the volume between mulitple containers and also want to persist out data while
docker volume create myJenkins
docker volume ls ## List volume
## Inspect volume and can see the mount poijnt
docker volume inspect myJenkins

## Now instead give physical location, just give the volume that was created
docker run --name myJenkins3 --platform linux/amd64  -p 8080:8080 -p 50000:50000 -v myJenkins:/var/jenkins_home  jenkins/jenkins

docker volume inspect myJenkins3
Dockerfile
- Dockerfile is a simple text file with instructions to build image. It is the automation of docker image creation
- When run
docker buildfor this docker file, images get created.
Step 1: create a file named Dockerfile
mkdir test

cd test

touch Dockerfile
Step 2: Add Instructions in Dockefile: is a sequence of instruction on how to create image, and each layer in the image is READ-ONLY, which allow efficient to share layers between images
- start with
FROMto give a base image- If want to build empty image, use
FROM scratch - when running
docker buildwill download image from registry
- If want to build empty image, use
- Give maintainer, it is optional, but is easy to find who is maintainer if add. Give your name and email address
RUNif want to run somethingCMDif want to something from container creation, can give thisCMD. Dockerfile can has only one Dockerfile- To have multiple commands, use
&&for chain commandsCMD ["sh","-c","mkdir directory && cd directory/ && touch new.file"] CMDcan be overridden by specifying an argument after the image name when calldocker run ubuntu ls, 那么将会列出ls, 不会像下面例子将不会打印Hello World...
- To have multiple commands, use
- Difference between
RUNandCMDRUNget executed during the building of the image.RUNis an image build step, the state of the container after aRUNcommand will be committed to the container image. A Dockerfile can have many RUN steps that layer on top of one another to build the image.CMDget executed only when you created a container out of the image</span>CMDexecutes by default when you launch the built image. A Dockerfile will only use the final CMD defined. The CMD can be overridden when starting a container withdocker run image other_command.
- Each instruction can create a READ-ONLY layer which depends on previous layer
ENTRYPOINTallows you to configure a container that will run as an executable. The difference betweenENTRYPOINTandCMDisENTRYPOINTcommand and parameters are not ignored when Docker container runs with command line parameters. (There is a way to ignore ENTTRYPOINT, but it is unlikely that you will do it.)- If image doesn’t specify
ENTRYPOINTorCMDit will be error - WORKDIR
Sample Docker File
# getting base image ubuntu
# if want to build empty image, use
# FROM scratch ## ON docker hub, scratch is a empty image
FROM ubuntu

# Optional, give a maintainer
MAINTAINER becks wu <dockerxxx@gmail.com>

RUN apt-get update

CMD ["echo", "Hello World... from my first docker image"]
Step 3: Build dockerfile to create image
## Give the location of the DockerFile
docker build /User/becks/Documents/test

## If already in the folder which contains DockerFile
docker build .

## Can use -t tag to tag your image with a name and tag
docker build -t myimage1:1.0 .
Step 4: Run image to create container
## Can find the image just built
docker images

docker run myimages1:1.0
## It will print Hello World... from my first docker image

## Will remove the container after stop it if not use this container further
docker run --rm myimages1:1.0
Docker RUN vs CMD vs ENTRYPOINT
When Docker runs a container, it runs an image inside it. This image is usually built by executing Docker instructions, which add layers on top of existing image or OS distribution. OS distribution is the initial image and every added layer creates a new image.
Final Docker image reminds an onion with OS distribution inside and a number of layers on top of it. For example, your image can be built by installing a number of deb packages and your application on top of Ubuntu 14.04 distribution.
ARG <name>[=<default value>]
The ARG instruction defines a variable that users can pass at build-time to the builder with the docker build command using the --build-arg <varname>=<value>
An ARG variable definition comes into effect from the line on which it is defined in the Dockerfile not from the argument’s use on the command-line or elsewhere. For example, consider this Dockerfile:
FROM busybox
USER ${user:-some_user}
ARG user
USER $user
# ...
A user builds this file by calling:
docker build --build-arg user=what_user .
The USER at line 2 evaluates to some_user as the user variable is defined on the subsequent line 3. The USER at line 4 evaluates to what_user as user is defined and the what_user value was passed on the command line. Prior to its definition by an ARG instruction, any use of a variable results in an empty string.
An ARG instruction goes out of scope at the end of the build stage where it was defined. To use an arg in multiple stages, each stage must include the ARG instruction.
Docker-compose
## To see all the commands of docker-compose
docker-compose help
- is a tool for defining & running multi-container docker applications
- use yaml files (
docker-compose.yml) to configure application services - can start/stop all services with a single comand
docker-compose upanddocker-compose down - can scale up selected service when required
docker-compose -v
docker-compose version
Step 1: Install docker-compose if on mac/windows, it is automatically installed with docker
Step 2: Create docker compose file docker-compose.yml
mkdir DockerComposeFile
cd DockerComposeFile
touch docker-compose.yml
vim docker-compose.yml
expose the port 80 of the web server and expose it on 8080 on host machine
version: '3' #  Need to see which version is supported for your docker-compose
services:  ##define a webservices
   web:
       image: nginx # is image of web services from docker hub
       ports:
       - 9090:80
   database:
       image: redis  # is image of database from docker hub
Step 3: Check the validity of file by command docker-compose config
Step 4: Run docker-compose.yml file command docker-compose up -d, -d is to detach
docker-compose up: creates a running services container, mounts given volumes at given mount points, creates a private network on which our service is a logical host, and manages DNS on the private network. (DNS name of services is the service name defined in docker-compose.yml file)
After it is done, run docker ps can see two container is running. One is nginx another is redis. Then go to http://localhost:9090/, can see nginx application is now running
Step 5: bring down application
Then run docker-compose down and run docker ps. There is no docker available
Scale
create 4 databases instances
docker-compose up -d --scale database=4
docker ps ## can see there are 4 redis running
Network Modes: Bridge Mode
depends_on: depends_on 的service will start before the 被依靠的service. e.g. Server must start at first- client and server are two hosts on the same logical network
- Bridge mode is the default for Docker network
- Bridge networks are used when applications run in standalone containers that need to communicate on the same docker daemon
docker-composemanages DNS on the networking so that it assign DNS name server to server container and assign DNS name client to client container
e.g
services:
    server:
        build .
    client:
        build .
        depends_on
        - server
Docker Volume
By default all files created inside a container are stored on a writable container layer. The data doesn’t persiste when that container is no longer running. The container’s writable layer is tightly coupled to the host machine where the container is running. Can’t easily move the data somewhere else
In case, you don’t provide any explicit location for that data to be stored, it get stored within the container. And when you delete/remove container, the data is lost.
Docker has two options for conainer to store files in the host machine
- Volumes:
- volumes are stored in a part of the host filesystem which is managed by Docker
- Non-Docker process should not modify this part of the filesystem
- Volumes are the best way to persist data in Docker.
- Volumes are managed by Docker and are isolated from core functionality of the host machine
- A given volume can be mounted into multiple containers simultaneously
- When no running container is using a volume, the volume is still available to Docker and is not removed automatically. You can remove unused volumes using
docker volume prume - when you mount a volume, it may be named or anonymous.
- Anonymous volumes are not given an explicit name when they are first mounted into a container
- Volumes also support the use of volume drivers, which allow to store your data on remote hosts or cloud provides among other possibilities.
- Bind Mountes
- Bind Mounts may be stored anywhere on the host system
- Non-Docker processes on the Docker host or a Docker container can modify them at any time
- In Bind Mounts, the file or directory is referenced by its full path on the host machine
Volumes are the preferred mechanism for persisting data generated by and used by Docker container
Use of Volumes:
- Decoupling container from storage
- Share volume (storage /data) among different containers
- Attach volume to container
- On deleting container volume does not delete
Volume Mountpoint is the volume available in local system and cannot be edited by functions locall
docker volume --

## Create Volume
docker volume create myvol1

## List volumes
docker volume ls

## Inspect volume, show created time and mountpoint
docker volume inspect myvol1

## Remove volum
docker volume rm myvol1

## Remove all unused volume (没有正在用的volume)
docker volume prune
docker pull jenkins/jenkins

## -p: expose port 8080 (local) of the container to port 8080 (server) of the host machine.
## -p: for api expose port 50000 of the container to port 50000 of the host machine.
## -v: specify Jenkins volume, So once stop Jenkins container, data won't lose. Also create volume
docker run --name myJenkins1 --platform linux/amd64  -p 8080:8080 -p 50000:50000 -v myvol1:/var/jenkins_home  jenkins/jenkins
Then go to http://0.0.0.0:8080/, (details instruction can viewed from Run Jenkins on Docker Container), Can create a new sample job
Then create another container by chaning name and port
docker run --name myJenkins2 --platform linux/amd64 -p 9090:8080 -p 60000:50000 -v myvol1:/var/jenkins_home jenkins/jenkins
Then go to http://0.0.0.0:9090/. Then use the same username and password to login, also has the job created before.
docker run --name myJenkins3 --platform linux/amd64 -p 9191:8080 -p 40000:50000 -v myvol1:/var/jenkins_home jenkins/jenkins