The blog is a summary of Coursera Specialization DeepLearning.AI TensorFlow Developer Professional. To see more detailed Tensorflow code examples, check this repo
A New Programming Paradigm
Keras: API in tensorflow, make it easy to define neural network
Denseto define a layer of connected neurons- loss function and optimiziers
compile - trainning model
fit - predict
predict
model = keras.Sequential([keras.layers.Dense(units=1, input_shape=[1])])
# only one neuron
# only one Dense here, so there are only one layer and only one unit
loss function and optimiziers
model.compile(optimizer='sgd', loss='mean_squared_error')
#sgd: stochastic gradient descent
Nerual network has no idea of relationship between X and Y. So it guess, e.g. Y = 10X - 1. Loss function measure how guess is good or bad, then give data to optimizer to figure out next guess. The logic is each guess should be better than the one before. When guess better and bettern, the term convergence is used
xs = np.array([-1,0,1,2,3,4], dtype = float)
ys = np.array([-3,-1,1,3,5,7], dtype = float)
model.fit(xs,ys,epochs = 500)
#describe training loop 500 times
print(model.predict([10,0]))
training result is not 19, but close to 19, 因为 一: training data is few. 二: when try to figure out answer, deal in probability
Convolution NN
fashion_mnist: Github:
- include 70k images spread across 10 categories of clothing, image are scaled at
28 x 28gray scale (只有一个channel, instead of 3) - fashion_mnist dataset, 60000 of 70000 used to train, 10000 can be used for testing
- train_labels, test_labels are number rather than text, which can reduce bias
# fashion_mnist.load_data() return 4 lists

fashion_mnist = keras.datasets.fashion_mnist
(training_iamges, training_labels), (test_images, test_labels) = fashion_mnist.load_data()

model = keras.Sequential([
    keras.layers.Flatten(input_shape=(28,28)),
    keras.layers.Dense(128, activation=tf.nn.relu),
    keras.layers.Dense(10,activation=tf.nn.softmax)
])
Callback
- callback function doesn’t need to be in a separate file.
- init will implement
on_epoch_endfunction which get called by the callback whenever epoch ends. It aslo sends log object which contains lots of information about current state of training
class myCallback(tf.keras.callbacks.Callback):
  def on_epoch_end(self, epoch, logs={}):
    if(logs.get('loss')<0.4):
      print("\nReached 60% accuracy so cancelling training!")
      self.model.stop_training = True

callbacks = myCallback()
mnist = tf.keras.datasets.fashion_mnist
(training_images, training_labels), (test_images, test_labels) = fashion_mnist.load_data()
#normalized data

training_iamges = training_images / 255.0
test_images = test_images / 255.0
model = keras.Sequential([
    keras.layers.Flatten(),
    keras.layers.Dense(128, activation=tf.nn.relu),
    keras.layers.Dense(10,activation=tf.nn.softmax)
])
model.compile(optimizer = 'adam', loss = 'sparse_categorical_crossentropy')
model.fit(training_images, training_labels, epochs=5. callbacks = [callbacks])

model.evaluate(test_images, test_labels)

classifications = model.predict(test_images)
Intermidate Layer Output
import matplotlib.pyplot as plt

model = tf.keras.models.Sequential([
  tf.keras.layers.Conv2D(64, (3,3), activation='relu', input_shape=(28, 28, 1)),
  tf.keras.layers.MaxPooling2D(2, 2),
  tf.keras.layers.Conv2D(64, (3,3), activation='relu'),
  tf.keras.layers.MaxPooling2D(2,2),
  tf.keras.layers.Flatten(),
  tf.keras.layers.Dense(128, activation='relu'),
  tf.keras.layers.Dense(10, activation='softmax')
])

CONVOLUTION_NUMBER = 1
from tensorflow.keras import models
layer_outputs = [layer.output for layer in model.layers]
activation_model = tf.keras.models.Model(inputs = model.input, outputs = layer_outputs)

for i in range(0,4):
    f1 = activation_model.predict(test_images[0].reshape(1, 28, 28, 1))[i]
    plt.imshow(f1[0, : , :, CONVOLUTION_NUMBER], cmap='inferno')
    print("f1.shape",f1.shape)

# f1.shape (1, 26, 26, 64)  -> Conv2D

# f1.shape (1, 13, 13, 64)  -> MaxPooling2D

# f1.shape (1, 11, 11, 64)  -> Conv2D

# f1.shape (1, 5, 5, 64)    -> MaxPooling2D
Visualize Intermediate Representations
import numpy as np
import random
from tensorflow.keras.preprocessing.image import img_to_array, load_img

model = tf.keras.models.Sequential([
    # This is the first convolution

    tf.keras.layers.Conv2D(16, (3,3), activation='relu', input_shape=(300, 300, 3)),
    tf.keras.layers.MaxPooling2D(2, 2),
    # The second convolution

    tf.keras.layers.Conv2D(32, (3,3), activation='relu'),
    tf.keras.layers.MaxPooling2D(2,2),
    # The third convolution

    tf.keras.layers.Flatten(),
    tf.keras.layers.Dense(512, activation='relu'),
    tf.keras.layers.Dense(1, activation='sigmoid')
])

successive_outputs = [layer.output for layer in model.layers]
layer_names = [layer.name for layer in model.layers]

visualization_model = tf.keras.models.Model(inputs = model.input, outputs = successive_outputs)
# Let's prepare a random input image from the training set.

train_human_names = os.listdir(train_human_dir)
img_path = os.path.join(train_human_dir, train_human_names[0])

img = load_img(img_path, target_size=(300, 300))  # this is a PIL image

x = img_to_array(img)  # Numpy array with shape (300, 300, 3)

x = x.reshape((1,) + x.shape)  # Numpy array with shape (1, 300, 300, 3)


# Rescale by 1/255

x /= 255
successive_feature_maps = visualization_model.predict(x)

for layer_name, feature_map in zip(layer_names, successive_feature_maps):
  if len(feature_map.shape) == 4:
    # Just do this for the conv / maxpool layers, not the fully-connected layers

    n_features = feature_map.shape[-1]  # number of features in feature map

    print(layer_name, feature_map.shape)

    # The feature map has shape (1, size, size, n_features)

    size = feature_map.shape[1]
    # We will tile our images in this matrix

    display_grid = np.zeros((size, size * n_features))
    for i in range(n_features):
      #  把一个feature 都horizontal display 出来, normalize feature

      x = feature_map[0, :, :, i]
      x -= x.mean()
      x /= x.std()
      x *= 64
      x += 128
      x = np.clip(x, 0, 255).astype('uint8')
      # We'll tile each filter into this big horizontal grid

      display_grid[:, i * size : (i + 1) * size] = x
    # Display the grid

    scale = 20. / n_features
    plt.figure(figsize=(scale * n_features, scale))
    plt.title(layer_name)
    plt.grid(False)
    plt.imshow(display_grid, aspect='auto', cmap='viridis')
output:
/tmp/horse-or-human/horses/horse49-5.png
(1, 300, 300, 3)
conv2d (1, 298, 298, 16)
max_pooling2d (1, 149, 149, 16)
conv2d_1 (1, 147, 147, 32)
max_pooling2d_1 (1, 73, 73, 32)
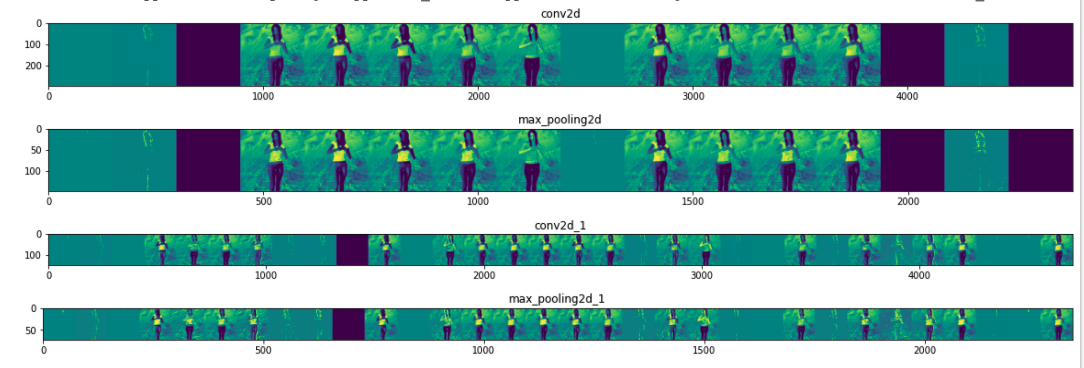
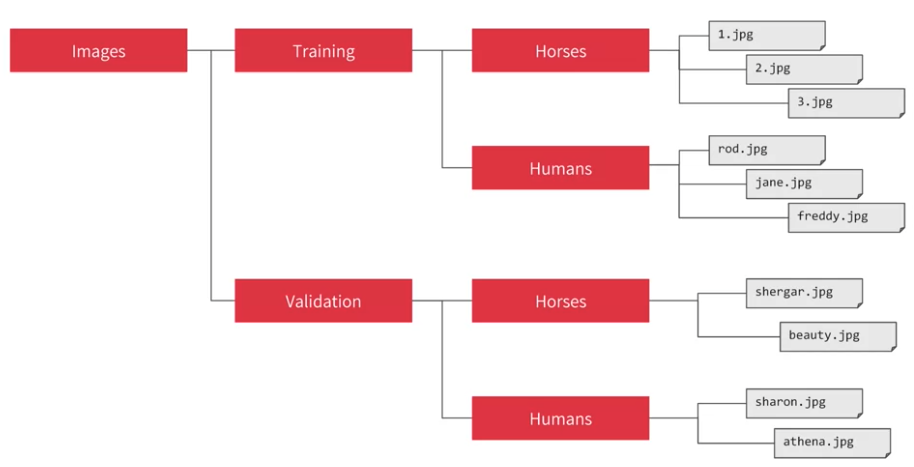
Image Generater
have sub-directory for training and validation, img generator will create for those images and auto label. The name of subdirectory will be the label
steps_per_epoch = TotalTrainingSamples / TrainingBatchSizevalidation_steps = TotalvalidationSamples / ValidationBatchSize
batch_size 和 steps_per_epoch 是为了spare computer memory,比如想run 一个epoch 用1024个training examples, 但computer memory 不允许,所以就每次run 128个,run 8回
from tensorflow.keras.preprocessing.image import ImageDataGenerator

# All images will be rescaled by 1./255

train_datagen = ImageDataGenerator(rescale=1/255)

# Flow training images in batches of 128 using train_datagen generator

train_generator = train_datagen.flow_from_directory(
        '/tmp/horse-or-human/',  # This is the source directory for training images, always point to directory not subdirectory

        target_size=(300, 300),  # All images will be resized to 300x300

        batch_size=128,
        # Since we use binary_crossentropy loss, we need binary labels

        class_mode='binary')


test_datagen = ImageDataGenerator(rescale=1/255)

# Flow training images in batches of 128 using train_datagen generator

validation_generator = test_datagen.flow_from_directory(
        validation_dir,
        target_size=(300, 300),  # All images will be resized to 300x300

        batch_size=32,
        # Since we use binary_crossentropy loss, we need binary labels

        class_mode='binary')


model.compile(loss='binary_crossentropy',
              optimizer=RMSprop(lr=0.001),
              metrics=['accuracy'])

#print accuracy, loss for training and validation

history = model.fit_generator(
      train_generator,
      steps_per_epoch=8,  #load 8 batches (8 x 128) from train_generator into one model training

      epochs=15,
      validation_data = validation_generator,
      validation_steps = 8, #When each epoch ends, the validation generator will yield validation_steps batches, run 8个 validation batches

      verbose=2) # verbose = 2 hide a little animation hiding epoch progress
Process Image
from tensorflow.keras.preprocessing import image

img = image.load_img(path, target_size=(300, 300))
x = image.img_to_array(img)
x = np.expand_dims(x, axis=0)

classes = model.predict(x, batch_size=10)
Data Augmentation
- Not to add image directly on the drive. augmentation will take place in memory and not overriding the data
- Data Augmentation doesn’t add more picture, but for each training epoch to change the image based on parameter specified to generate more scenarios in the images
- 比如下图猫的耳朵是竖的,如果在test set 耳朵不是完全竖的, 可能认不出来了 => overfitting. But if training set include rotated image, 也许就可以认出耳朵斜的的

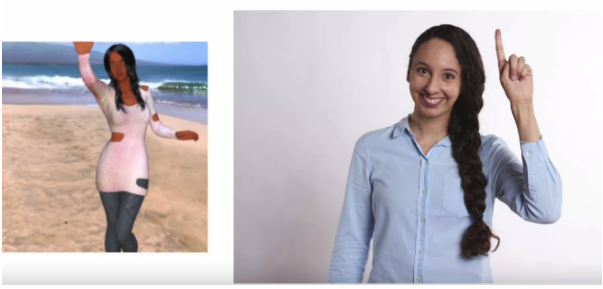
Shear Image
下图左侧的是在training set, 右侧的人姿势(orientation)不在training set中,所以把左侧的image shear 一下会得到类似的姿势(pose)


Zoom Image: 左侧image in training set, 右侧的人face right, 如果zoom 左侧的会得到类似右侧的图片. If zoom, may see some generalized example


Horizontal Flipping: training set 只有left-arm raiser 没有right-arm raiser, flip horizontally 可以得到right-arm raiser

train_datagen = ImageDataGenerator(
    rescale = 1. / 255,
    rotation_range = 40, #image  will rotate between 0 - 40 degree

    width_shift_range = 0.2,  # randomly shift up to 20% horizontal

    height_shift_range = 0.2, # randomly shift up to 20% vertically

    shear_range = 0.2, #shear randomly up to  20% percent of the image

    zoom_range =0.2, #0.2 is relative image you will zoom in,random amount up to 20% of image

    horizontal_flip = True, # image will be flip randomly

    fill_mode = 'nearest' # fill nay pixels that maybe lost by the operations. nearest: use neighbors of that pixel to try to keep uniformity

    #with the neighbors of that pixels to try and keep uniformity

)
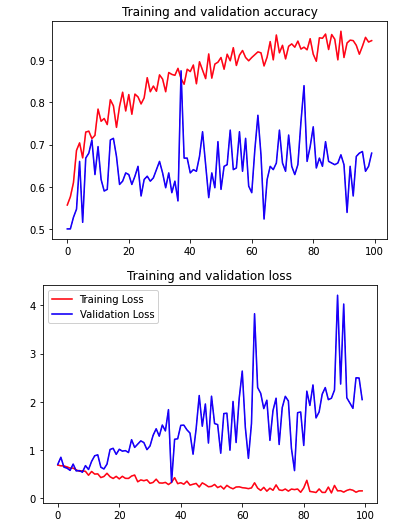
如果training set introduce randomness by data augmentation but validation set doesn’t have the same randomness, validation loss will fluctuate around the result 就会像下图 (training set 和 test set 的image 很像很接近, 比如train set & test set 人都是center and stand in the image, zoom 和rotate 后的图片会显得人不是站着的,cannot generalize result)
- so must have broad image for training and testing, 否则data augmentation won’t help
Transfer Learning
Lock all layers which are are trained on very large datasets by others, and only train Dense layer with your own data
Below use ImageNet which are trained on 1.4 million images in a 1000 different classes
from tensorflow.keras.applications.inception_v3 import InceptionV3

local_weights_file = '/tmp/inception_v3_weights_tf_dim_ordering_tf_kernels_notop.h5'

pre_trained_model = InceptionV3(input_shape = (150,150,3),
                                include_top = False, # specify that ignore fully-connected layer at the top and straight to the convolution (Inception V3 has a fully-connected layer at the top)

                                weights = None) # you don't want to use the built-in weights but use the snapshot you just download it

pre_trained_model.load_weights(local_weights_file)


#****************************************#

# Iterate through Layers  to lock layers without changing parameters

#****************************************#

for layer in pre_trained_model.layers:
  layer.trainable = False # specify not to train within the local

print(pre_trained_model.summary())
last_layer = pre_trained_model.get_layer('mixed7')
print('last layer output shape: ', last_layer.output_shape)
last_output = last_layer.output

x = layers.Flatten()(last_output)
x = layers.Dense(1024, activation='relu')(x)
x = layers.Dropout(0.2)(x)
x = layers.Dense  (1, activation='sigmoid')(x)

model = Model( pre_trained_model.input, x)
model.compile(optimizer = RMSprop(lr=0.0001),
              loss = 'binary_crossentropy',
              metrics = ['accuracy'])
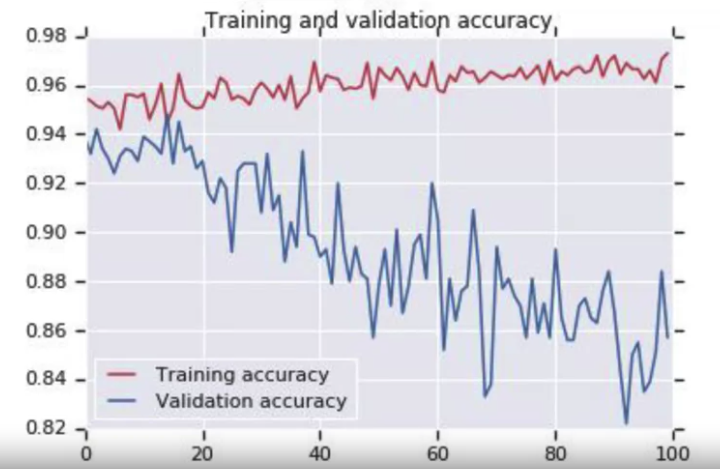
Dropout
The idea behind Dropouts is that they remove a random number of neurons in your neural network. This works very well for two reasons:
- Neighboring neurons often end up with similar weights, which can lead to overfitting, so dropping some out at random can remove this.
- Often a neuron can over-weigh the input from a neuron in the previous layer. Can’t rely on any one feature and weights won’t put much weight on any one input, so have to spread out weights, and can over specialize as a result. Thus, dropping out can break the neural network out of this potential bad habit!
Disadvantage: cost function J is no-longer well defined, at every iteration, you randomly kill some node。 It is hard to double check gradient descent function 每个 iteration 都 decrease
x = layers.Dropout(0.2)(x) # Parameter is between 0 and 1, it's fraction unit to drop
比如遇到下图, validation accuracy diverge from training accuracy through the time,it worths trying Dropout
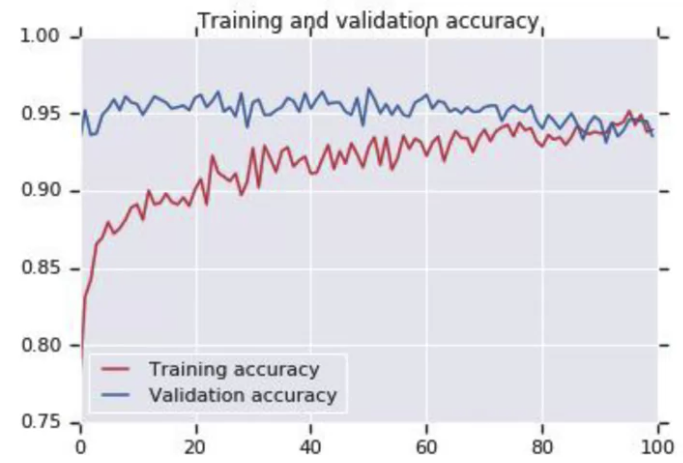
After applying Dropout
NLP
Tokenizer
Why not trained based on letters? 比如 “silent” vs “listen”, same letters but opposite meaning.
Tokenizer matters model performance.
from tensorflow import keras
from tensorflow.keras.preprocessing.text import Tokenizer
from tensorflow.keras.preprocessing.sequence import pad_sequences #for padding

# sentences of different lengths

sentences = [
     "I love my dog",
     "I, love my cat",
     "You love my dog!", # ! won't impact token as dog!

     "Do you think my dog is amazing?"
]

tokenizer = Tokenizer(num_words = 100, oov_token = "<unk>") #Take top 100 words by frequency,

# 如果不加oov_token, 比如dog 不在vocabulary,

# tokenizer.texts_to_sequences("You love my dog!")

# -> 返回 【1,2,3】 ignore dog

tokenizer.fit_on_texts(sentences)
word_index = tokenizer.word_index
sequences = tokenizer.texts_to_sequences(sentences) #transform each text in texts into integers from token

padded = pad_sequences(sequences)
print(word_index) #key is word, token is the value

print(sequences)
print(padded)
# {'<unk>': 1, 'my': 2, 'love': 3, 'dog': 4, 'i': 5, 'you': 6, 'cat': 7, 'do': 8, 'think': 9, 'is': 10, 'amazing': 11}

#[[5, 3, 2, 4], [5, 3, 2, 7], [6, 3, 2, 4], [8, 6, 9, 2, 4, 10, 11]]

#[[ 0  0  0  5  3  2  4]

# [ 0  0  0  5  3  2  7]

# [ 0  0  0  6  3  2  4]

# [ 8  6  9  2  4 10 11]]


padded = pad_sequences(sequences, padding = 'post')
print(padded[0])
# [5 3 2 4 0 0 0]
If I have a sentence longer than maxlen, I’ll lose information, default is pre-padding, lose the beginning of the sentences. can specify lose at the end of sentences by truncating='post'
pad_sequences(sequences, padding = "post", truncating='post', maxlen = 5)
TFDS Pre-tained Tokenizer
imdb_reviews/subwords8k: Usetdfs.features.text.SubwordTextEncoderwith 8k vocab sizeimdb_reviews/subwords32k: Usetdfs.features.text.SubwordTextEncoderwith 32k vocab size
import tensorflow_datasets as tfds
imdb, info = tfds.load("imdb_reviews/subwords8k", with_info = True, as_supervised = True)
train_data, test_data = imdb["train"], imdb["test"]

tokenizer = info.features["text"].encoder #access tokenizer from Pre-trained

print(tokenizer.subwords) #by looking up its vocabulary

sample_string = "TensorFlow, from basics to mastery"

tokenized_string = tokenizer.encode(sample_string)
print("Tokenized string is {}".format(tokenized_string))

original_string = tokenizer.decode(tokenized_string)
print("The original string: {}".format(original_string))
One more thing if use Flatten layer after embedding from imdb embedding may crash instead using GlobalAveragePooling1D
model = tf.keras.Sequential([
    tf.keras.layers.Embedding(tokenizer.vocab_size, embedding_dim),
    tf.keras.layers.GlobalAveragePooling1D(),
    tf.keras.layers.Dense(6, activation='relu'),
    tf.keras.layers.Dense(1, activation='sigmoid')
])
Above model will not do a good job because using subword. Subwords are often non-sense and only put in sequence have meaningful semantics -> should using recurrent neural networks
Embedding
tf.keras.layers.Embedding: Use specified dimension (input_dim x output_dim) Embedded matrix to get embedded vector for each word in the sequence with length of input_length. Embedded matrix applied to each word is the same. Output will be input_length x output_dim
input_dimas vocabulary dimension for one-hot vectoroutput_dimas embedding dimension.- input_length: Length of input sequences, when it is constant. This argument is required if you are going to connect Flatten then Dense layers upstream(without it, the shape of the dense outputs cannot be computed).
vocab_size = 10000
embedding_dim = 16
max_length = 120

model = tf.keras.Sequential([
    tf.keras.layers.Embedding(vocab_size, embedding_dim, input_length=max_length), # parameter is embedding matrix size = vocab_size x embedding_dim, input_length is length of sentence

    tf.keras.layers.Flatten(),
    tf.keras.layers.Dense(6, activation = tf.nn.relu),
    tf.keras.layers.Dense(1, activation = 'sigmoid')
])
Using Pre-Trained word embeddings
word_to_vec_map = {}
with open("glove.6B.50d.txt", 'r') as f:
    for line in f:
        line = line.strip().split()
        curr_word = line[0]
        word_to_vec_map[curr_word] = np.array(line[1:], dtype=np.float64)

# Method 1

emb_dim = 20
vocab_size =  len(word_to_index)+1 # adding 1 to fit Keras embedding (requirement), word_to_index dictionary

embedding_matrix = np.zeros((vocab_size, emb_dim))

for word, index in word_to_index.items():
    embedding_matrix[index,:] = word_to_vec_map[word]

embedding_layer = Embedding(input_dim=vocab_size, output_dim=emb_dim, trainable = False)

# Build the embedding layer, it is required before setting the weights of the embedding layer. Do not modify the "None".

embedding_layer.build((None,))

# Set the weights of the embedding layer to the embedding matrix. Your layer is now pretrained.
embedding_layer.set_weights([embedding_matrix])
e1 = embedding_layer.get_weights()[0][1][3]

# Method 2

embedding_layer = Embedding(input_dim=vocab_size, output_dim=emb_dim, weights=[embedding_matrix], trainable = False)
model= tf.keras.Sequential(embedding_layer)
e2 = model.layer[0].get_weights()[0][1][3]

print(e1 == e2) # return true
Get Weight
model = tf.keras.Sequential([
    tf.keras.layers.Embedding(10000, 16, input_length=120), # parameter is embedding matrix size = vocab_size x embedding_dim, input_length is length of sentence

    tf.keras.layers.Flatten(),
    tf.keras.layers.Dense(6, activation = tf.nn.relu),
    tf.keras.layers.Dense(1, activation = 'sigmoid')
])

e = model.layers[0]
weights = e.get_weights()[0] # Note e.get_weights() return a list have only 1 element

print(weights.shape) #shape: (vocab_size, embedding_dim), (10000, 16)

# 10000 words in corpus, and work in 16 dimensional array
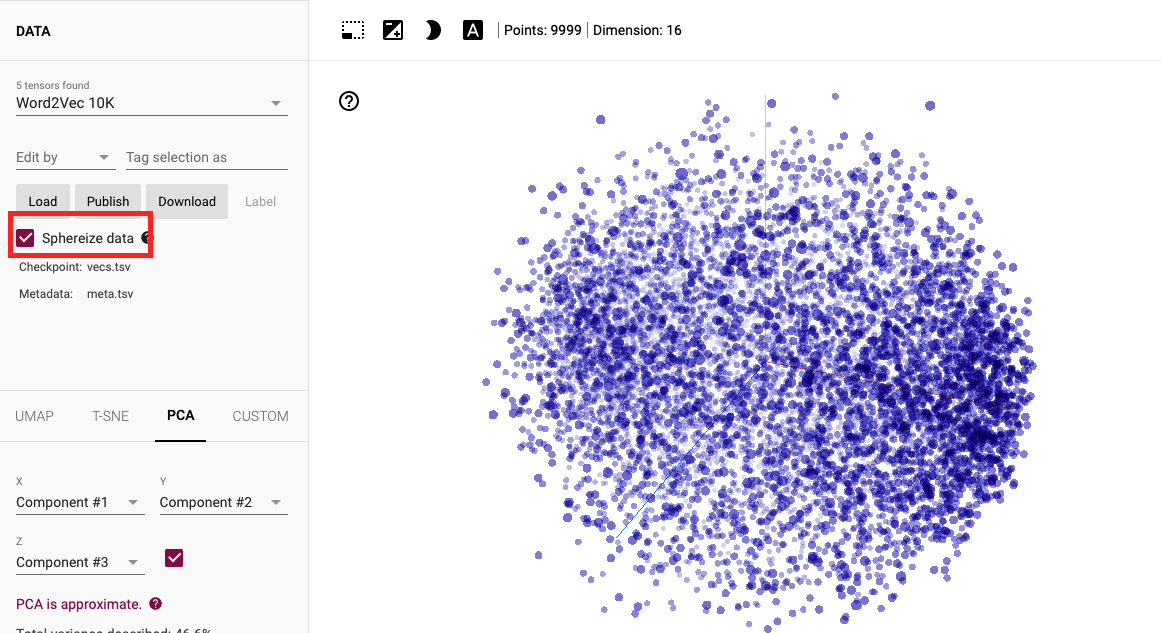
Visualize Embedding
After generalize file, open Tensorflow Projecter to project word embedding and check Sphereize data
import tensorflow as tf
import tensorflow_datasets as tfds
imdb, info = tfds.load("imdb_reviews", with_info=True, as_supervised=True)

import numpy as np

# Load
train_data, test_data = imdb['train'], imdb['test']

training_sentences = []
training_labels = []

testing_sentences = []
testing_labels = []

# str(s.tonumpy()) is needed in Python3 instead of just s.numpy()

for s,l in train_data:
  training_sentences.append(s.numpy().decode('utf8'))
  training_labels.append(l.numpy())

for s,l in test_data:
  testing_sentences.append(s.numpy().decode('utf8'))
  testing_labels.append(l.numpy())

training_labels_final = np.array(training_labels)
testing_labels_final = np.array(testing_labels)

vocab_size = 10000
embedding_dim = 16
max_length = 120
trunc_type='post'
oov_tok = "<OOV>"

# Tokenize sentence

from tensorflow.keras.preprocessing.text import Tokenizer
from tensorflow.keras.preprocessing.sequence import pad_sequences

tokenizer = Tokenizer(num_words = vocab_size, oov_token=oov_tok)
tokenizer.fit_on_texts(training_sentences)
word_index = tokenizer.word_index
sequences = tokenizer.texts_to_sequences(training_sentences)
padded = pad_sequences(sequences,maxlen=max_length, truncating=trunc_type)

testing_sequences = tokenizer.texts_to_sequences(testing_sentences)
testing_padded = pad_sequences(testing_sequences,maxlen=max_length)


model = tf.keras.Sequential([
    tf.keras.layers.Embedding(vocab_size, embedding_dim, input_length=max_length),
    tf.keras.layers.Flatten(),
    tf.keras.layers.Dense(6, activation='relu'),
    tf.keras.layers.Dense(1, activation='sigmoid')
])
model.compile(loss='binary_crossentropy',optimizer='adam',metrics=['accuracy'])

num_epochs = 10
model.fit(padded, training_labels_final, epochs=num_epochs, validation_data=(testing_padded, testing_labels_final))

e = model.layers[0]
weights = e.get_weights()[0]  # Note e.get_weights() return a list have only 1 element

print(weights.shape) # shape: (vocab_size, embedding_dim)

reverse_word_index = dict([(value, key) for (key, value) in word_index.items()]) # token as key and word as value


import io

out_v = io.open('vecs.tsv', 'w', encoding='utf-8')
out_m = io.open('meta.tsv', 'w', encoding='utf-8')
for word_num in range(1, vocab_size):
  word = reverse_word_index[word_num]
  embeddings = weights[word_num]
  out_m.write(word + "\n")
  out_v.write('\t'.join([str(x) for x in embeddings]) + "\n")
out_v.close()
out_m.close()
To One-hot vector
#labels (mx1) is a numpy array which one element is each label for trainning exmple

ys = tf.keras.utils.to_categorical(labels, num_classes=total_words)
Generate text
Since below is trained for a song. May generate results which have repetition of words such as many ball, all show up

import tensorflow as tf

from tensorflow.keras.preprocessing.sequence import pad_sequences
from tensorflow.keras.layers import Embedding, LSTM, Dense, Bidirectional
from tensorflow.keras.preprocessing.text import Tokenizer
from tensorflow.keras.models import Sequential
from tensorflow.keras.optimizers import Adam
import numpy as np
tokenizer = Tokenizer()

data="In the town of Athy one Jeremy Lanigan \n Battered away til he hadnt a pound. \nHis father died and made him a man again \n Left him a farm and ten acres of ground. \nHe gave a grand party for friends and relations \nWho didnt forget him when come to the wall, \nAnd if youll but listen Ill make your eyes glisten \nOf the rows and the ructions of Lanigans Ball. \nMyself to be sure got free invitation, \nFor all the nice girls and boys I might ask, \nAnd just in a minute both friends and relations \nWere dancing round merry as bees round a cask. \nJudy ODaly, that nice little milliner, \nShe tipped me a wink for to give her a call, \nAnd I soon arrived with Peggy McGilligan \nJust in time for Lanigans Ball. \nThere were lashings of punch and wine for the ladies, \nPotatoes and cakes; there was bacon and tea, \nThere were the Nolans, Dolans, OGradys \nCourting the girls and dancing away. \nSongs they went round as plenty as water, \nThe harp that once sounded in Taras old hall,\nSweet Nelly Gray and The Rat Catchers Daughter,\nAll singing together at Lanigans Ball. \nThey were doing all kinds of nonsensical polkas \nAll round the room in a whirligig. \nJulia and I, we banished their nonsense \nAnd tipped them the twist of a reel and a jig. \nAch mavrone, how the girls got all mad at me \nDanced til youd think the ceiling would fall. \nFor I spent three weeks at Brooks Academy \nLearning new steps for Lanigans Ball. \nThree long weeks I spent up in Dublin, \nThree long weeks to learn nothing at all,\n Three long weeks I spent up in Dublin, \nLearning new steps for Lanigans Ball. \nShe stepped out and I stepped in again, \nI stepped out and she stepped in again, \nShe stepped out and I stepped in again, \nLearning new steps for Lanigans Ball. \nBoys were all merry and the girls they were hearty \nAnd danced all around in couples and groups, \nTil an accident happened, young Terrance McCarthy \nPut his right leg through miss Finnertys hoops. \nPoor creature fainted and cried Meelia murther, \nCalled for her brothers and gathered them all. \nCarmody swore that hed go no further \nTil he had satisfaction at Lanigans Ball. \nIn the midst of the row miss Kerrigan fainted, \nHer cheeks at the same time as red as a rose. \nSome of the lads declared she was painted, \nShe took a small drop too much, I suppose. \nHer sweetheart, Ned Morgan, so powerful and able, \nWhen he saw his fair colleen stretched out by the wall, \nTore the left leg from under the table \nAnd smashed all the Chaneys at Lanigans Ball. \nBoys, oh boys, twas then there were runctions. \nMyself got a lick from big Phelim McHugh. \nI soon replied to his introduction \nAnd kicked up a terrible hullabaloo. \nOld Casey, the piper, was near being strangled. \nThey squeezed up his pipes, bellows, chanters and all. \nThe girls, in their ribbons, they got all entangled \nAnd that put an end to Lanigans Ball."

corpus = data.lower().split("\n")

tokenizer.fit_on_texts(corpus)
total_words = len(tokenizer.word_index) + 1

print(total_words)

input_sequences = []
for line in corpus:
	token_list = tokenizer.texts_to_sequences([line])[0]
	for i in range(1, len(token_list)):
		n_gram_sequence = token_list[:i+1]
		input_sequences.append(n_gram_sequence)

# pad sequences
max_sequence_len = max([len(x) for x in input_sequences])
input_sequences = np.array(pad_sequences(input_sequences, maxlen=max_sequence_len, padding='pre'))

# create predictors and label
xs, labels = input_sequences[:,:-1],input_sequences[:,-1]

ys = tf.keras.utils.to_categorical(labels, num_classes=total_words)

  model = Sequential()
  model.add(Embedding(total_words, 64, input_length=max_sequence_len-1))
  model.add(Bidirectional(LSTM(20)))
  model.add(Dense(total_words, activation='softmax'))
  model.compile(loss='categorical_crossentropy', optimizer='adam', metrics=['accuracy'])
  history = model.fit(xs, ys, epochs=500, verbose=1)

# Predict

seed_text = "Laurence went to dublin"
next_words = 100

for _ in range(next_words):
	token_list = tokenizer.texts_to_sequences([seed_text])[0]
	token_list = pad_sequences([token_list], maxlen=max_sequence_len-1, padding='pre')
	predicted = model.predict_classes(token_list, verbose=0)
	output_word = ""
    # reversed look-up

	for word, index in tokenizer.word_index.items():
		if index == predicted:
			output_word = word
			break
	seed_text += " " + output_word
print(seed_text)
Sequence, Time Series
Time Series: have feature of trend, seasonality, autocorrelation and white noise. some combine trend and seasonality
White Noise: unpredictable, random value
- Stationary: means behavior does not change over time, more data is better
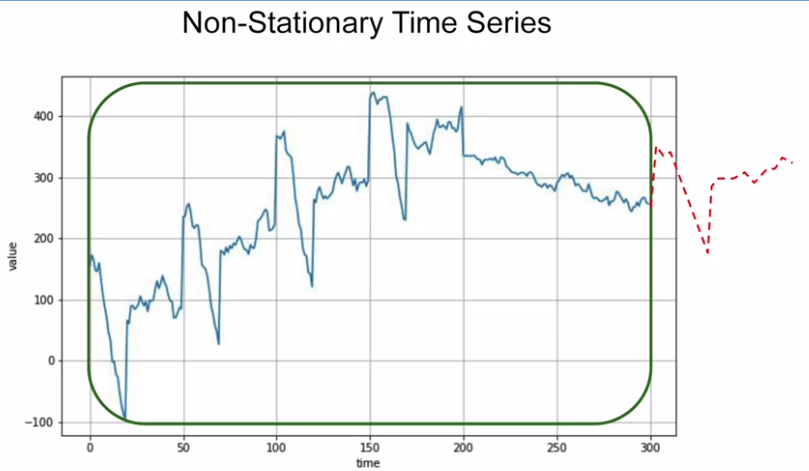
- Non-stationary: the optimal time window for training vary
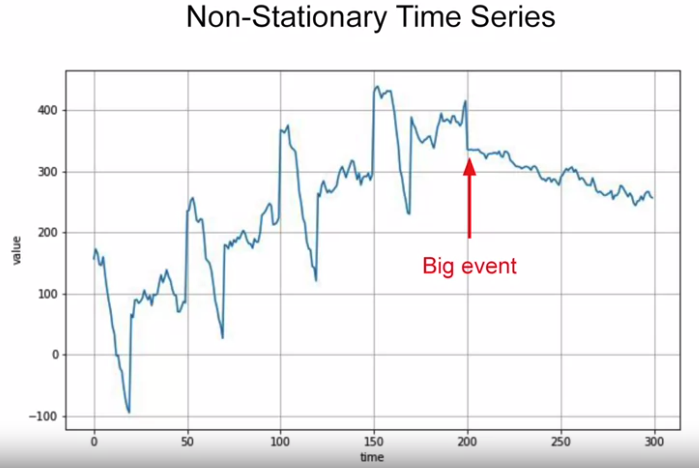
Time series trend change, could train for limited period of time, e.g. last 100 steps. Will get a better performance than training on a entire dataset, which break in machine learning assuming more data the better
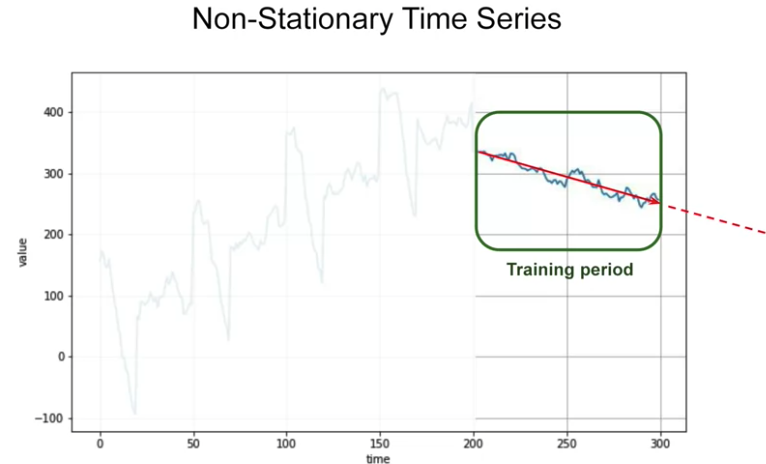
Ideally, would like to take the whole series and generate prediction for what happen next
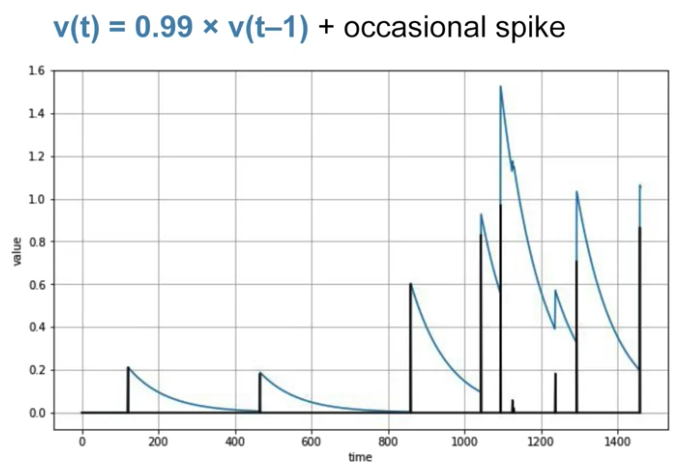
Below is auto-correlated time series: it correlated with a delayed copy of itself called a lag
Train Test Split
For More detailed check this
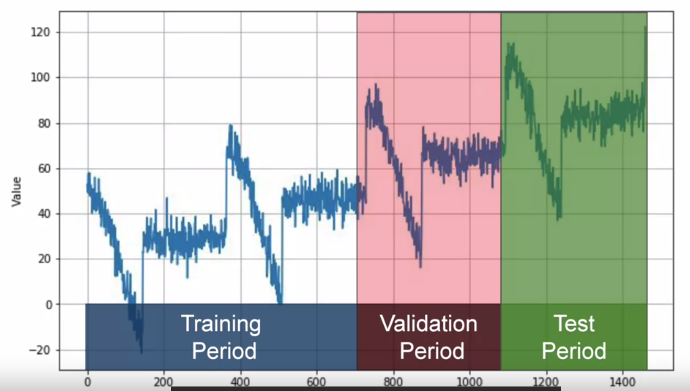
Method 1 Fixed Partitioning:
Fixed Partitioning: 如下图. If time series has seasonality, you want to ensure that each period contains a whole number of seasons.
Method 1 Fixed Partitioning**: Fixed Partitioning: 如下图. If time series has seasonality, you want to ensure that each period contains a whole number of seasons.
- Train model on training period and evaluate it on validation period. tune hyper parameteres until get desired performance using validation set.
- Tehn can re-train on both training and validation data, and test it on test set to see if model performance just well.
- Could take unusual step of re-training again, use all training, validation and test set, because test data is closed data you have to the current point in time and has strongest signal to determine future values.
It is comon that forgo test set all together, just train using training period and validation period, and test set is in the future(现在还没有的data)
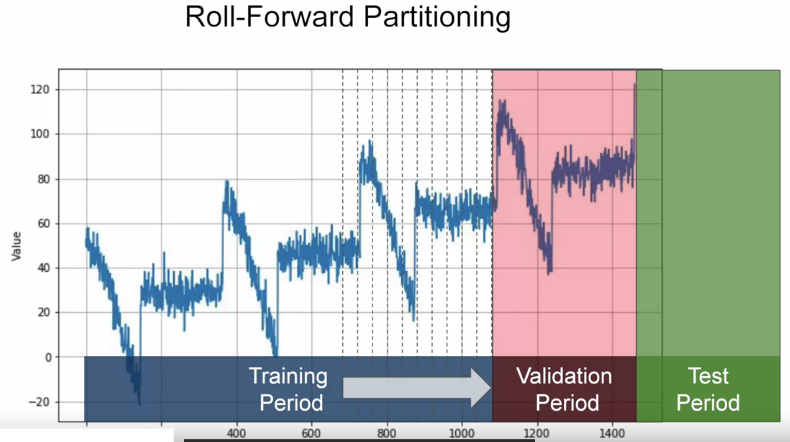
Method 2 Roll-forward Partitiong:
start with a short training period, then gradually increase it. Say by one day at a time or one week at a time. At each iteration, we train model on a training period(day/week) and forcast the following day or following week in the validation period
e.g. train model on first week in training set then test model on first week in validation set. Then train model on second week in training set then test it on second week in validation set, gradually roll
Metrics
errors = forecasts - actual: difference from model and actual values over evalution period -mse = np.square(errors).mean()square to get rid of negative valuesrmse = np.sqrt(mse): want the mean of error calculation to be the same scale as original errorsmae = np.abs(errors).mean(): mean absolute error, also called mean absolute derivation or mad, this is not penalize large errors as mush as mse does. Depending on task, may prefermaeormse.- If large errors are dangerous and cost much more than smaller errors, prefer
mse - If gain or loss is just proportional to the size of the error,
maeis better
- If large errors are dangerous and cost much more than smaller errors, prefer
mape = np.abs(errors / x_valid).mean(): mean absolute percentage error. mean ratio between absolute error and absolute value. this gives the idea of size of errors compared to the values
# MAE

keras.metrics.mean_absolute_error(x_valid, naive_forecast).numpy()
Convolutional NN Layers
keras.layers.Conv2D
filters: Integer, the dimensionality of the output spacekernel_sizeAn integer or tuple/list of 2 integers, specifying the height and width of the 2D convolution window. Can be a single integer to specify the same value for all spatial dimensions.stridesAn integer or tuple/list of 2 integers, specifying the strides of the convolution along the height and width. Can be a single integer to specify the same value for all spatial dimensions. Specifying any stride value != 1 is incompatible with specifying any dilation_rate value != 1.paddingone of “valid” or “same” (case-insensitive). “valid” means no padding. “same” results in padding evenly to the left/right or up/down of the input such that output has the same height/width dimension as the inputinput_shape(tuple of integers, does not include the sample axis), e.g. input_shape=(128, 128, 3) for 128x128 RGB pictures in data_format=”channels_last”.
tf.keras.layers.Conv2D(
    filters, # Integer, the dimensionality of the output space
    kernel_size,#filter   specifying the height and width of the 2D convolution window.
    strides=(1, 1),
    padding="valid",
    data_format=None,
    dilation_rate=(1, 1),
    groups=1,
    activation=None,
    use_bias=True,
    kernel_initializer="glorot_uniform",
    bias_initializer="zeros",
    kernel_regularizer=None,
    bias_regularizer=None,
    activity_regularizer=None,
    kernel_constraint=None,
    bias_constraint=None,
    **kwargs
)
y = tf.keras.layers.Conv2D(
2, 3, activation='relu', padding="same", input_shape=input_shape[1:])(x)
CONV2D
- filter order is [filter_height, filter_width, in_channels, out_channels]
- input order is[batch_shape, in_height, in_width, in_channels]
initializer=tf.initializers.GlorotUniform(seed = 0)
W1 = tf.Variable(initializer([4, 4, 3, 8]),name="W1")
X = np.random.randn(2,64,64,3).astype(np.float32)

Z1 = tf.nn.conv2d(X, W1, strides=[1,1,1,1], padding='SAME')
# Z1 Shape: (2,64,64,8)
Dense
Just your regular densely-connected NN layer.
Dense implements the operation: output = activation(dot(input, kernel) + bias) where activation is the element-wise activation function passed as the activation argument, kernel is a weights matrix created by the layer, and bias is a bias vector created by the layer (only applicable if use_bias is True).
Note: If the input to the layer has a rank greater than 2, then Dense computes the dot product between the inputs and the kernel along the last axis of the inputs and axis 1 of the kernel (using tf.tensordot). For example, if input has dimensions (batch_size, d0, d1), then we create a kernel with shape (d1, units), and the kernel operates along axis 2 of the input, on every sub-tensor of shape (1, 1, d1) (there are batch_size * d0 such sub-tensors). The output in this case will have shape (batch_size, d0, units).
tf.keras.layers.Dense(
    units,
    activation=None,
    use_bias=True,
    kernel_initializer="glorot_uniform",
    bias_initializer="zeros",
    kernel_regularizer=None,
    bias_regularizer=None,
    activity_regularizer=None,
    kernel_constraint=None,
    bias_constraint=None,
    **kwargs
)
Flatten
Flattens the input. Does not affect the batch size.
tf.keras.layers.Flatten()(X)
Max_pool
#A1 Shape:  (2, 64, 64, 8)
P1 = tf.nn.max_pool(A1, ksize=[1,8,8,1], strides=[1,8,8,1], padding='SAME')
# P1 Shape (2,8,8,8)
Max_pool layer padding Difference between padding='SAME' and padding = 'VALID'
“VALID” = without padding:
   inputs:         1  2  3  4  5  6  7  8  9  10 11 (12 13)
                  |________________|                dropped
                                 |_________________|
“SAME” = with zero padding:
               pad|                                      |pad
   inputs:      0 |1  2  3  4  5  6  7  8  9  10 11 12 13|0  0
               |________________|
                              |_________________|
                                             |________________|
In this example:
- Input width = 13
- Filter width = 6
- Stride = 5
Notes:
“VALID” only ever drops the right-most columns (or bottom-most rows). “SAME” tries to pad evenly left and right, but if the amount of columns to be added is odd, it will add the extra column to the right, as is the case in this example (the same logic applies vertically: there may be an extra row of zeros at the bottom).
About the name:
- With “SAME” padding, if you use a stride of 1, the layer’s outputs will have the same spatial dimensions as its inputs.
- With “VALID” padding, there’s no “made-up” padding inputs. The layer only uses valid input data.
MaxPool2D
pool_sizeinteger or tuple of 2 integers, window size over which to take the maximum. (2, 2) will take the max value over a 2x2 pooling window. If only one integer is specified, the same window length will be used for both dimensions.stridesInteger, tuple of 2 integers, or None. Strides values. Specifies how far the pooling window moves for each pooling step. If None, it will default to pool_size.paddingOne of “valid” or “same” (case-insensitive). “valid” means no padding. “same” results in padding evenly to the left/right or up/down of the input such that output has the same height/width dimension as the input.
max_pool_2d = tf.keras.layers.MaxPooling2D(pool_size=(2, 2),
   strides=(1, 1), padding='same')
Model
Model
Note Input dimension is one training example dimension, should not include batch size
Two way to initiate Model
1 - With the “Functional API”
inputs = keras.Input(shape=(784,), name="digits")
x = layers.Dense(64, activation="relu", name="dense_1")(inputs)
x = layers.Dense(64, activation="relu", name="dense_2")(x)
outputs = layers.Dense(10, activation="softmax", name="predictions")(x)

model = keras.Model(inputs=inputs, outputs=outputs)
2 - By subclassing the Model class: in that case, you should define your layers in __init__ and you should implement the model’s forward pass in call.
import tensorflow as tf

class MyModel(tf.keras.Model):

  def __init__(self):
    super(MyModel, self).__init__()
    self.dense1 = tf.keras.layers.Dense(4, activation=tf.nn.relu)
    self.dense2 = tf.keras.layers.Dense(5, activation=tf.nn.softmax)

"""
If you subclass Model, you can optionally have a training argument (boolean) in call, which you can use to specify a different behavior in training and inference:
"""

  def call(self, inputs, training=False):
    x = self.dense1(inputs)
    if training:
      x = self.dropout(x, training=training)
    return self.dense2(x)


model = MyModel()
Compile
optimizer: String (name of optimizer) or optimizer instance. See tf.keras.optimizers.loss: String (name of objective function), objective function or tf.keras.losses.Loss instance. To specify different metrics for different outputs of a multi-output model, you could also pass a dictionary, such asmetrics={'output_a': 'accuracy', 'output_b': ['accuracy', 'mse']}. You can also pass a list (len = len(outputs)) of lists of metrics such asmetrics=[['accuracy'], ['accuracy', 'mse']]ormetrics=['accuracy', ['accuracy', 'mse']]metrics: ```python compile( optimizer=’rmsprop’, loss=None, metrics=None, loss_weights=None, weighted_metrics=None, run_eagerly=None, steps_per_execution=None, **kwargs )
model.compile( optimizer=keras.optimizers.RMSprop(), # Optimizer # Loss function to minimize loss=keras.losses.SparseCategoricalCrossentropy(), # List of metrics to monitor metrics=[keras.metrics.SparseCategoricalAccuracy()], )
#### fit

- Return: A `History` object. Its History.history attribute is a record of training <span style="color:red">loss values and metrics values</span> at successive epochs, as well as validation loss values and validation metrics values (if applicable).

```python
fit(
    x=None, y=None, batch_size=None, epochs=1, verbose=1, callbacks=None,
    validation_split=0.0, validation_data=None, shuffle=True, class_weight=None,
    sample_weight=None, initial_epoch=0, steps_per_epoch=None,
    validation_steps=None, validation_batch_size=None, validation_freq=1,
    max_queue_size=10, workers=1, use_multiprocessing=False
)
model.compile(
    optimizer=keras.optimizers.RMSprop(),  # Optimizer
    # Loss function to minimize
    loss=keras.losses.SparseCategoricalCrossentropy(),
    # List of metrics to monitor
    metrics=[keras.metrics.SparseCategoricalAccuracy()],
)

history = model.fit(
    x_train,
    y_train,
    batch_size=64,
    epochs=2,
    # We pass some validation for
    # monitoring validation loss and metrics
    # at the end of each epoch
    validation_data=(x_val, y_val),
)

# history.history
"""
{'loss': [0.344687819480896, 0.15941613912582397],
 'sparse_categorical_accuracy': [0.9019200205802917, 0.9523000121116638],
 'val_loss': [0.1892719268798828, 0.1630939543247223],
 'val_sparse_categorical_accuracy': [0.9483000040054321, 0.9488000273704529]}
 """
evaluate
- return Scalar test loss (if the model has a single output and no metrics) or list of scalars (if the model has multiple outputs and/or metrics). The attribute model.metrics_names will give you the display labels for the scalar outputs.
results = model.evaluate(x_test, y_test, batch_size=128)
print("test loss, test acc:", results)

# test loss, test acc: [0.17500483989715576, 0.9459999799728394]


predictions = model.predict(x_test[:3])
print("predictions shape:", predictions.shape)
# predictions shape: (3, 10)
Predict
batch_size: Integer or None. Number of samples per batch. If unspecified, batch_size will default to 32. Do not specify the batch_size if your data is in the form of dataset, generators, or keras.utils.Sequence instances (since they generate batches). verbose Verbosity mode, 0 or 1.stepsTotal number of steps (batches of samples) before declaring the prediction round finished. Ignored with the default value of None. Ifxis a tf.data dataset and steps is None, predict will run until the input dataset is exhausted.return: Numpy array(s) of predictions.
return = predict(
    x, batch_size=None, verbose=0, steps=None, callbacks=None, max_queue_size=10,
    workers=1, use_multiprocessing=False
)
Image
load_img
Loads an image into PIL format.
color_modeOne of “grayscale”, “rgb”, “rgba”. Default: “rgb”. The desired image format.target_sizeEither None (default to original size) or tuple of ints (img_height, img_width).interpolationInterpolation method used to resample the image if the target size is different from that of the loaded image. Supported methods are “nearest”, “bilinear”, and “bicubic”. If PIL version 1.1.3 or newer is installed, “lanczos” is also supported. If PIL version 3.4.0 or newer is installed, “box” and “hamming” are also supported. By default, “nearest” is used.
tf.keras.preprocessing.image.load_img(
    path, color_mode='rgb', target_size=None,
    interpolation='nearest'
)
img_to_array
Converts a PIL Image instance to a Numpy array.
img: Input PIL Image instance.data_format: Image data format, can be either “channels_first” or “channels_last”. Defaults to None, in which case the global setting tf.keras.backend.image_data_format() is used (unless you changed it, it defaults to “channels_last”).dtype: Dtype to use. Default to None, in which case the global setting tf.keras.backend.floatx() is used (unless you changed it, it defaults to “float32”)
tf.keras.preprocessing.image.img_to_array(
    img, data_format=None, dtype=None
)

from PIL import Image
img_data = np.random.random(size=(100, 100, 3))
img = tf.keras.preprocessing.image.array_to_img(img_data)
array = tf.keras.preprocessing.image.img_to_array(img)
preprocess_input
The images are converted from RGB to BGR(tenserflow model process based on BGR), then each color channel is zero-centered with respect to the ImageNet dataset, without scaling.
tf.keras.applications.resnet.preprocess_input(
    x, data_format=None
)
Link / Reference
- AI Google: Responsible AI practices
- Image Filtering
- Understanding Categorical Cross-Entropy Loss, Binary Cross-Entropy Loss, Softmax Loss, Logistic Loss, Focal Loss and all those confusing names
- Understanding RMSprop
- Image Augmentation: like rotating 90 degrees of images. It doesn’t require you to edit your raw images, nor does it amend them for you on-disk. It does it in-memory as it’s performing the training, allowing you to experiment without impacting your dataset
- Kaggle News Headlines Dataset For Sarcasm Detection Problem
- News headlines dataset for sarcasm detection
- EMbedding Tensorflow Projector